

If you’re searching for a “thermal label printer for Amazon FBA,” you’re usually trying to solve two problems at once: (1) buying the right printer, and (2) making sure your labels print the right size without cropping, rotation, or blurry barcodes. This guide walks you through both—without pretending there’s one perfect printer for every seller.
Pick the right FBA label printer
You don’t need a “special Amazon printer”—you need a setup that matches the label types you print most and produces scannable labels without scaling mistakes. In most cases, a 4×6 direct-thermal printer is the simplest workflow for FBA box/pallet labels, while product/FNSKU labels may require a separate label stock or a different workflow.
1) Thermal vs regular printer (fast decision)
- Occasional shipments / low box count: a laser/ink printer can be fine—you’ll just spend more time cutting/taping multi-label sheets.
- Frequent shipments / many cartons: thermal is usually worth it because you print one label at a time and reduce handling.
2) Which labels are “4×6” (fast mapping)
| Label type | Where you use it | “4×6” commonly applies? | What to watch |
|---|---|---|---|
| Box / shipping labels | Outside each carton you send to FBA | Yes, often (thermal 4×6 option) | Avoid scaling/cropping; confirm in preview |
| Pallet labels | Palletized shipments | Yes, often (thermal 4×6 option) | Confirm you’re in the right workflow for pallet labels |
| Product/FNSKU labels | On individual units (when required) | Not automatically | Different label requirements; don’t assume 4×6 |
3) The 5 specs that prevent 80% of headaches
- Supports 4-inch wide labels (for 4×6 shipping labels)
- Stable drivers for your OS (Windows/macOS) and easy paper-size control
- Prints at a consistent size with scaling disabled (100% / no “fit to page”)
- Reliable connection (USB is usually simplest; wireless is convenience with more variables)
- Uses easy-to-source direct thermal labels (no ink/toner)
Boundary note: Seller Central options and label formats can change—always verify by print preview and a single test label before batch printing.
Do you really need a thermal label printer for Amazon FBA? (vs laser/ink)
Thermal isn’t “required for FBA,” but it often becomes the most practical choice once you’re printing lots of labels. If you ship frequently or handle many cartons per shipment, thermal saves time because you print labels individually and skip the cut-and-tape step that comes with letter-size sheets.
Use these scenario checks:
- You’re fine with a regular printer if…
- You ship occasionally, and cutting labels doesn’t bother you.
- Your team is small and you’d rather keep costs minimal than optimize speed.
- Thermal becomes practical if…
- You routinely print labels in batches (dozens of cartons).
- Reprints are common because of scaling/cropping or misaligned sheets.
- You want a simpler “one label = one carton” workflow (fewer mix-ups).
A good mental model: you’re buying repeatability more than speed. Even a modest-volume seller can benefit if label printing is becoming a source of rework.
FBA label types explained: which ones are 4×6 (and which aren’t)
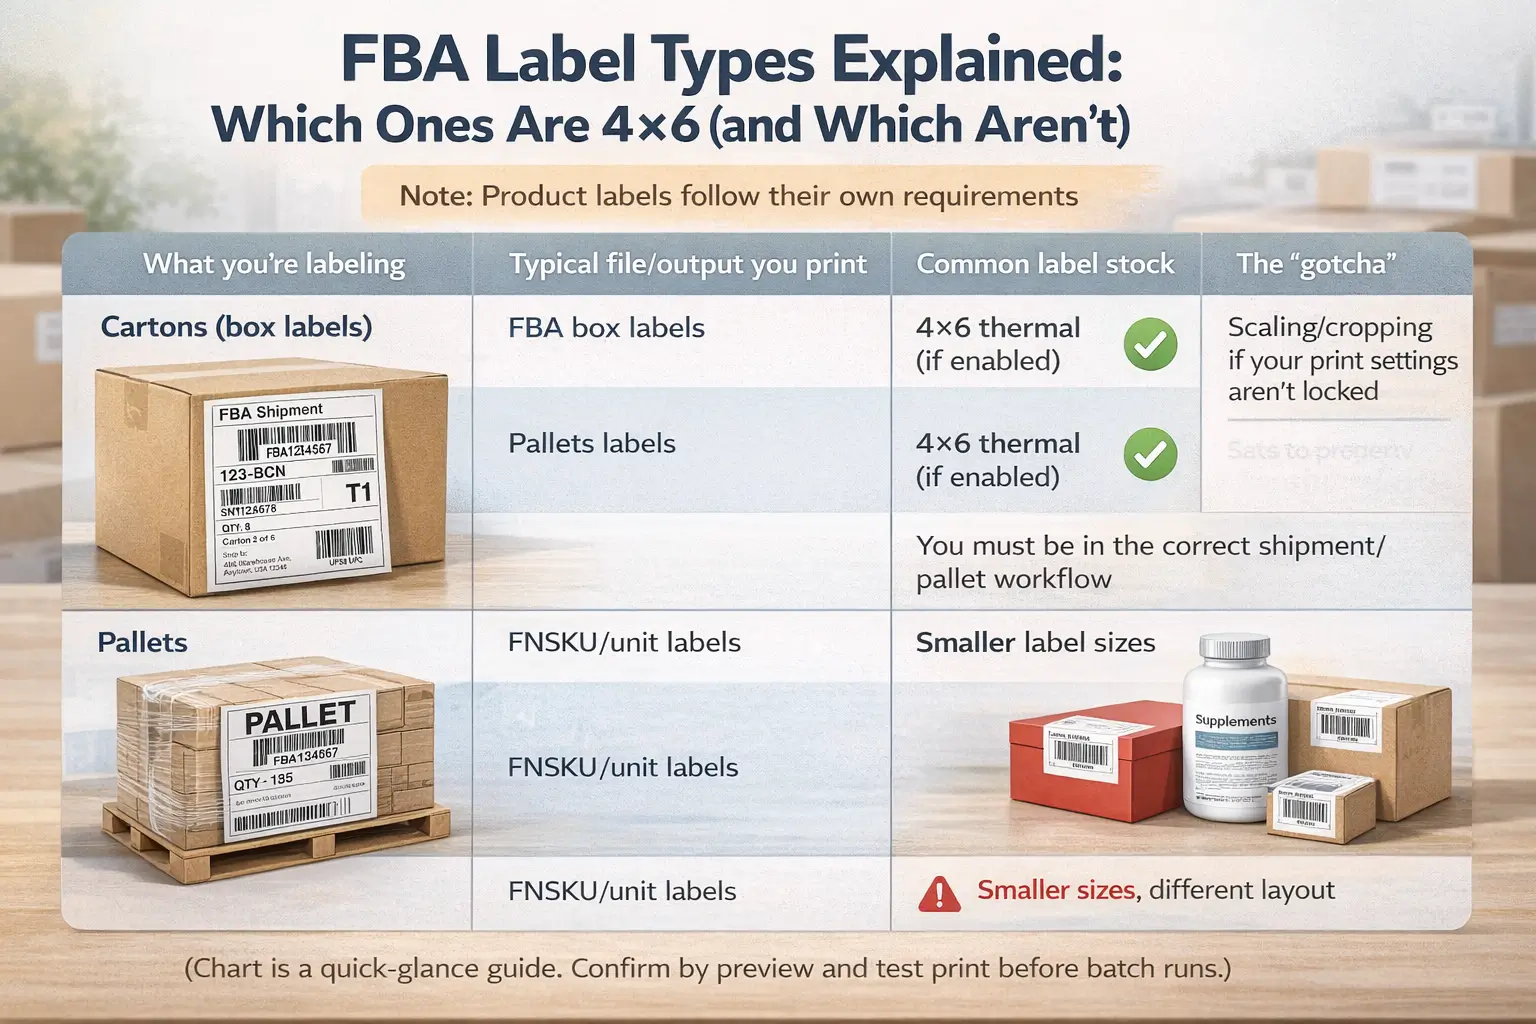
The most common mistake is buying a 4×6 printer and assuming everything in FBA is 4×6. In reality, “4×6” usually matters most for box/carton labels and pallet labels, while product/FNSKU labels follow a different set of requirements and label stock choices.
A simple label map (keep this next to your workstation)
| What you’re labeling | Typical file/output you print | Common label stock | The “gotcha” |
|---|---|---|---|
| Cartons (box labels) | FBA box labels | 4×6 thermal (if enabled) | Scaling/cropping if your print settings aren’t locked |
| Pallets | Pallet labels | 4×6 thermal (if enabled) | You must be in the correct shipment/pallet workflow |
| Units (product/FNSKU) | FNSKU/unit labels | Smaller label sizes | Label paper and layout requirements are different |
Common mistakes that create relabel work
- Printing a 4×6 file onto letter-size settings (or the reverse)
- Letting the printer/driver “help” by auto-scaling
- Mixing product label tasks and carton label tasks without a clear workflow boundary
Boundary note: Amazon’s tools and formats evolve. Treat the help docs as the source of truth, then confirm by preview and a single test label before you batch print.
The printer spec checklist that matters for FBA (4×6, drivers, DPI, workflow fit)
For FBA, the “best” printer is the one that prints your labels at the correct size every time with minimal fiddling. Prioritize specs that reduce setup friction and keep barcodes crisp, and treat everything else as optional.
Must-have (for most FBA box/pallet labeling)
- 4-inch label width support (so 4×6 labels feed correctly)
- Direct thermal printing (simple supply chain: labels only, no ink/toner)
- Driver stability for your OS (especially if you’re on macOS—verify before you buy)
- Paper size control (easy to set and keep locked to 4×6)
- Consistent scaling behavior (able to print at 100% without “fit to page”)
Nice-to-have (depends on your workflow)
- Higher resolution (e.g., 300 DPI) if you’re printing dense text or very small barcodes
- Wireless printing if your workstation layout demands it (but expect more variables)
- Auto label detection / easier calibration if multiple people use the same station
Practical tip: the “spec” that causes the most pain is often not DPI—it’s driver behavior and scaling defaults. Make “prints true size reliably” your main filter.
Direct thermal vs thermal transfer vs ink/laser: what actually fits FBA labels
Most FBA sellers who primarily print shipping/box labels do well with direct thermal, because labels are typically used for a short lifecycle (prep → inbound → receiving). Thermal transfer can be useful when you need extra durability, while laser/ink is workable when you don’t mind cutting sheets and you ship infrequently.
| Option | How it works (plain English) | When it’s a good fit | Trade-offs |
|---|---|---|---|
| Direct thermal | Heat activates label coating (no ribbon) | Most 4×6 FBA box/pallet labels | Labels can be sensitive to heat/abrasion in extreme conditions |
| Thermal transfer | Heat transfers ink from a ribbon onto label | Extra durability needs, long storage, harsh handling | More supplies (ribbons), more complexity |
| Laser/ink | Prints on sheets | Low-volume sellers, occasional shipments | Cutting/taping time; higher friction; easier to introduce scaling mistakes |
If you’re unsure: start by matching the tech to your volume and where labels live. If labels are mostly used for inbound handling, simplicity usually wins.
How to print FBA box & pallet labels on 4×6 without scaling/cropping
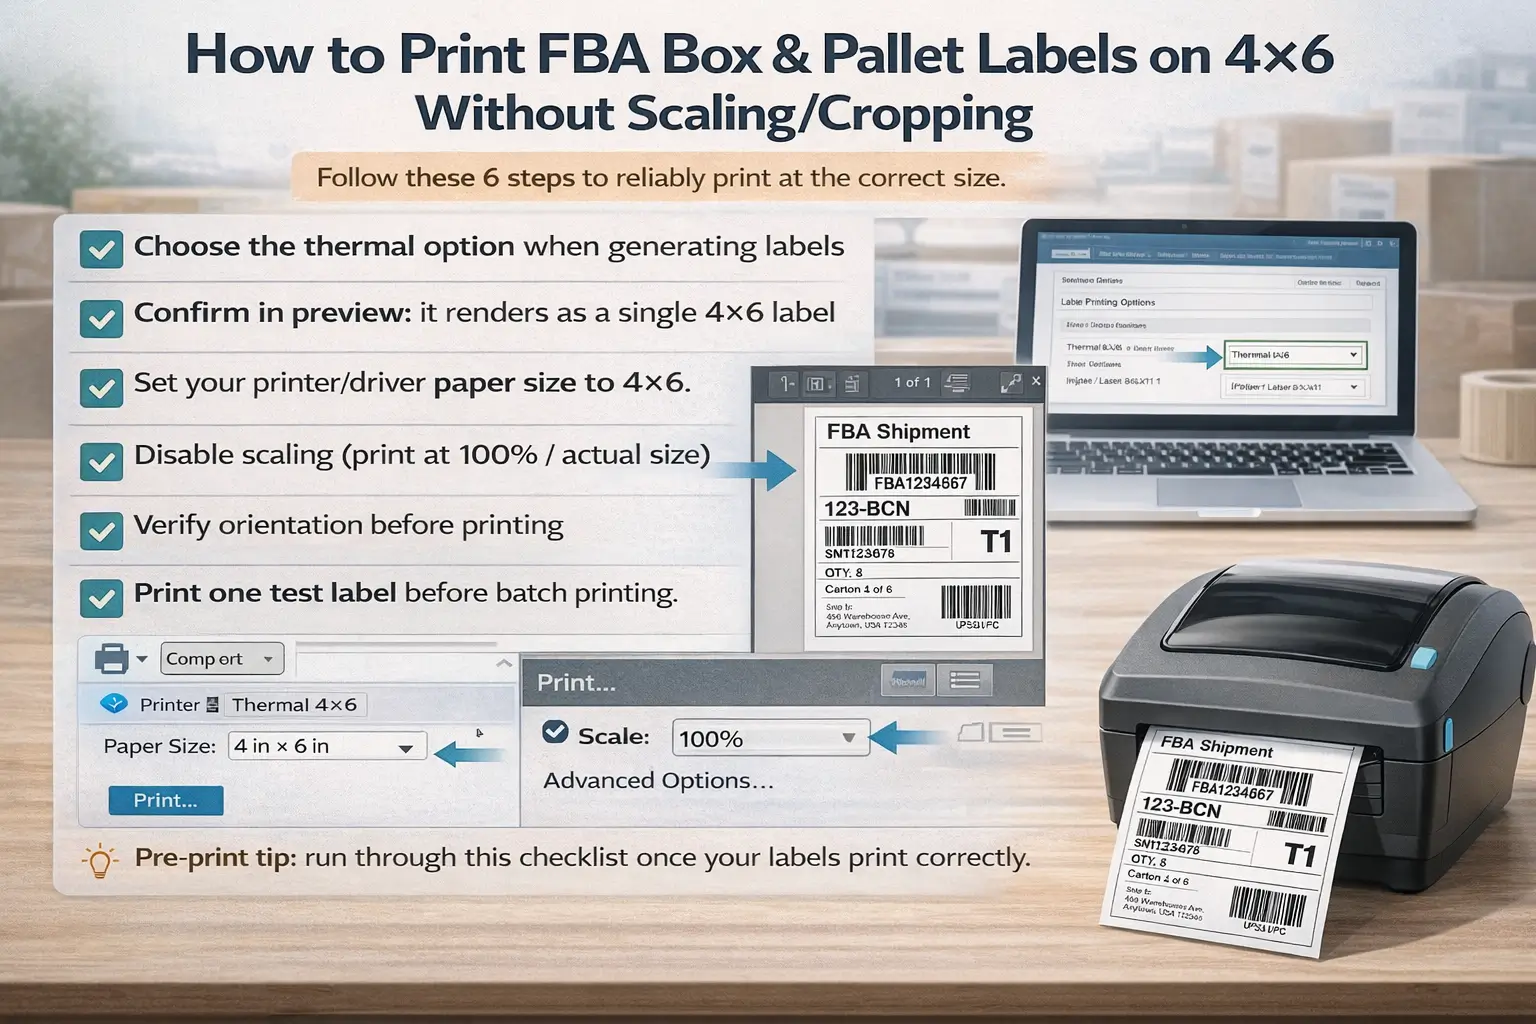
If you want reliable 4×6 printing, the goal is simple: use the thermal 4×6 format when available, lock the paper size to 4×6, and disable scaling.
6-step setup (verification-first)
- Choose the thermal option when generating labels (when available).
Confirm in preview: the label renders as a single 4×6 label (not multiple labels on a letter page). - Set your printer/driver paper size to 4×6 (10×15 cm).
Confirm in preview: the page/label size shown by your print dialog is 4×6. - Disable scaling (print at 100% / actual size).
Confirm in preview: barcodes and borders are not clipped; the label fills the intended 4×6 area. - Verify orientation before printing.
Confirm in preview: text reads normally and the barcode is not rotated unexpectedly. - Print one test label before batch printing.
Confirm physically: barcode is sharp, high-contrast, and fully on-label (no cut-off edges). - Batch print with one standardized workflow.
Confirm consistency: if multiple people print labels, they use the same format and the same saved print preset.
If your output is still wrong after these steps, jump straight to the troubleshooting table—most issues come down to scaling, paper size, or format/orientation mismatches.
PDF vs ZPL (and orientation): why your labels print wrong even when “4×6” is selected
Even with a 4×6 selection, labels can print wrong if the format your system sends doesn’t match how the printer/driver interprets size and orientation. You’ll often see PDF-based printing, and in some contexts ZPL-based printing for compatible thermal printers—each behaves differently in the print pipeline.
- If you’re getting random scaling/cropping in PDFs: force 100% / no scaling and confirm the print dialog shows 4×6.
- If you’re using a workflow that supports ZPL formats: treat orientation settings as part of the “format,” not a cosmetic preference—changing formats after the fact can create reprint quirks in some setups.
- When in doubt: pick one format that prints correctly, save that preset, and keep it consistent across your team.
Pre-print QA checklist: 30 seconds that prevents 30 wasted labels
Before you print a batch, use this quick checklist to catch most problems early. It won’t eliminate every failure mode, but it dramatically reduces reprints caused by preventable settings.
- Print preview shows 4×6 (not letter-size)
- Scaling is 100% / none (not “fit to page”)
- Barcode is fully inside the label (no clipping at edges)
- Text is readable and not compressed
- You printed one test label and confirmed it scans (or at least looks crisp)
Troubleshooting: labels printing wrong size, rotated, or cut off (symptom → fix)
When labels print wrong, the fastest fix is symptom-first: identify the failure mode, then adjust the one setting most likely causing it.
| Symptom | Most likely cause | What to check / fix (in order) |
|---|---|---|
| Prints too small on a 4×6 label | Scaling enabled | Set scaling to 100% / none; confirm preview shows 4×6 |
| Barcode or border cut off | Wrong paper size or margins | Set paper size to 4×6; confirm the preview isn’t clipping; test print one label |
| Prints multiple labels on one page | You generated a letter-size sheet format | Re-generate labels using the thermal option (when available); confirm preview shows one label per page |
| Label is rotated (90°/180°) | Orientation mismatch (driver or format) | Check orientation setting; confirm preview; keep one consistent workflow format |
| Looks fine on screen but barcode is blurry/fuzzy | Print quality, contrast, or label stock issues | Reduce speed/increase darkness (if available); confirm label stock is compatible; test print and visually inspect |
| “Correct size” but doesn’t scan reliably | Low contrast or missing quiet zone/white space | Ensure sufficient white space around barcode and clean print; don’t shrink barcodes to “make it fit” |
Prevention tip: once you have a working setup, save the print preset and stop experimenting mid-workflow.
FNSKU/product labels: how to handle them when your main printer is 4×6
If your main printer is optimized for 4×6 box labels, product/FNSKU labels can become your next bottleneck. The simplest approach is to choose a product-label workflow based on SKU count and then add a tiny QC routine to prevent mix-ups.
Mini decision tree (pick a workflow you can repeat)
- Few SKUs / occasional relabeling
- Print product labels in small batches
- Keep a simple “SKU → label file” naming convention
- Add a 10-second check: count labels printed vs units to label
- Many SKUs / frequent relabeling
- Batch by SKU (one SKU at a time) to reduce switching errors
- Consider a dedicated product-label stock and a repeatable station setup
- Use a two-step QC: (1) verify the first label, (2) spot-check every new batch
Don’t ignore label basics (they affect scan success)
Practical workflow tip: treat “product labeling” and “carton labeling” as two separate tasks with separate checklists. Mixing them is how wrong labels end up on the wrong units.
Label rolls & workflow habits that reduce reprints
Most “label waste” comes from inconsistent settings and inconsistent supplies, not from the printer itself. If you standardize your label stock and your printing habits, you cut down on reprints and reduce the chance of unreadable labels.
Supply checklist (criteria-based)
- Correct size for the job (4×6 for box/pallet labels)
- Compatible core size / roll type for your printer
- Adhesive that sticks to corrugate and typical packaging surfaces
- Stored away from heat/moisture (especially for thermal labels)
Workflow habits that pay off
- One saved print preset (paper size + scaling locked)
- One test label at the start of every batch
- Separate stations (or at least separate checklists) for carton vs product labels
- Quick visual checks: clipped borders, low contrast, or crowded barcodes
When to outsource labeling/prep: a neutral decision framework + handoff checklist
You don’t need to outsource to be successful—but outsourcing can be a rational choice when labeling turns into repeat rework or steals time from higher-value tasks. If you’re juggling multiple suppliers, lots of SKUs, or frequent relabeling, a prep partner can standardize the workflow and reduce back-and-forth—at the cost of giving up some hands-on control.
Outsource triggers (practical, not salesy)
- You’re spending hours per week on label printing/applying and it keeps growing
- You have multiple suppliers and cartons arrive inconsistently labeled or packaged
- You see repeat issues: wrong-size prints, relabeling, mixed-up SKUs
- You need consolidation, inspection, or kitting anyway—labeling is part of a larger workflow
What to hand off (so the partner can label correctly)
- SKU list + which SKUs require product labels
- Label files (or clear instructions on where they come from in your workflow)
- Carton plan (carton counts, which SKUs go in which cartons)
- Any special packaging/prep notes (polybagging, bundles, fragile protection)
If you’re sourcing from multiple factories in China and want one team to handle consolidation, inspection, kitting, and FBA labeling before shipping to the US, FBABEE can support that end-to-end workflow (prep + freight coordination). We’re an independent logistics/prep provider and not affiliated with Amazon—the goal is simply to reduce rework and make inbound preparation more repeatable.
FAQ
Q: Do I need a thermal label printer for Amazon FBA, or can I use a regular printer?
A: You can use a regular printer, especially for low-volume shipping, but thermal usually becomes the easier workflow as label volume grows. Thermal lets you print one label at a time and reduces cutting/taping time; the key is repeatable settings (paper size + no scaling) and a quick test print.
Q: What label sizes do I need for FBA, and which ones use 4×6?
A: 4×6 most often shows up for box/carton and pallet labels when thermal printing is supported, while product/FNSKU labels follow different label requirements and stock. Use a label-type map first, then verify your actual output by preview and a single test print.
Q: What printer specs matter most for FBA labels (4×6 support, DPI, drivers, connectivity)?
A: Prioritize 4-inch label width support, stable OS drivers, and predictable scaling at 100%—those prevent most “wrong size” failures. DPI and wireless features matter, but they’re secondary to “prints true size reliably” and a repeatable preset.
Q: Why are my FBA labels printing the wrong size, rotated, or cut off—and how do I fix it?
A: Most issues come from scaling (“fit to page”), wrong paper size, or orientation/format mismatches. Fix it symptom-first: confirm 4×6 paper size, disable scaling, verify preview, then test print one label before batch printing.
Q: How do I print FBA box/pallet labels on 4×6 without scaling issues?
A: Use the thermal label option when available, lock paper size to 4×6, and print at 100% with scaling off. Always confirm by preview (no clipping) and run one test label before you print a batch.
Q: When should I outsource labeling/prep instead of doing it in-house?
A: Consider outsourcing when labeling becomes a weekly time sink, when multi-supplier shipments create inconsistent prep, or when relabeling/rework keeps repeating. The clean handoff is a SKU list, label files, and a carton plan—so the partner can label accurately without constant questions.
Summary: your next 3 actions (based on your situation)
You don’t need to “optimize everything”—you need a workflow you can repeat. Pick the next action that matches your current stage:
- If you’re new or low volume: map your label types, print a few shipments, and only upgrade to thermal if cutting/taping becomes a bottleneck.
- If you’re scaling cartons: move to a 4×6 workflow, lock paper size + scaling, and standardize a test-print routine.
- If you’re drowning in SKUs/suppliers: separate product vs carton labeling workflows, add a QC step, and consider outsourcing prep/labeling when rework keeps repeating.


