

If you’re here because your labels keep printing the “wrong size,” you’re not alone—most problems come from mixing up label types or letting the PDF scale. This guide helps you pick the right format (4×6 vs 8.5×11) and print labels that stay scannable through transit and receiving.
Amazon FBA shipment label size (4×6 vs 8.5×11) + the 10-second label sanity check
If you’re printing Amazon FBA shipment (carton/box) labels, you can typically print them as 4×6 (thermal) or on US Letter (8.5×11) sheets—the right choice depends on your printer and whether you can select the thermal label option in your shipment workflow. The fastest way to avoid wasted prints is to confirm you’re printing the carton label (box ID) and then verify your PDF is set to print at actual size (no scaling) in the print preview.
10-second sanity check (do this before you print anything):
- Is this label going on the outside of the shipping carton? If yes, you’re looking for the FBA carton/box ID label (shipment label).
- Is this label going on the individual product/unit? If yes, that’s a unit label (often FNSKU)—different label, different purpose.
- Does your workflow show a thermal/4×6 option? If yes, choose it and confirm the preview looks like a single 4×6 label, not a full page.
- Does the barcode look stretched, tiny, or cut off in preview? If yes, fix scaling before you print.
Quick triage table (label type → what to print):
| What you’re labeling | Label you need | Typical print format options | Common mistake |
|---|---|---|---|
| Shipping carton going to an Amazon FC | Carton/box ID (shipment label) | 4×6 thermal or 8.5×11 sheets (depending on workflow/printer) | Printing a carrier label only |
| Individual product/unit | Unit label (often FNSKU) | Usually sheet labels (format varies) | Confusing unit labels with carton labels |
| Pallet (if you ship palletized) | Pallet labels | Depends on shipment type | Skipping carton labels when cartons are also labeled |
Boundary conditions (read before you act):
- Seller portal screens and defaults can vary by account, marketplace, and shipment type—use “what to look for” checks, not brittle click paths.
- Treat “4×6” as an option when the thermal format is available/selected in your workflow, not as a universal guarantee.
- For the most current sizing constraints (including any minimum supported size), verify against Amazon’s latest shipment label requirements documentation in Seller Central.
Which label are you printing? Carton label vs carrier label vs pallet label vs FNSKU
Once you know the size decision, the most important step is confirming label type: an FBA carton (box ID) label identifies the box for Amazon receiving, while a carrier label routes the box through UPS/FedEx/DHL, and a unit (FNSKU) label identifies the individual product. If you print the wrong label type—even perfectly—you can still create receiving delays or relabel work.
One-line definitions (keep these straight):
- Carton/box ID label (shipment label): Goes on each carton; used to identify cartons as part of the shipment at receiving.
- Carrier label: The UPS/FedEx/DHL label that gets the carton delivered; it does not replace the carton/box ID label.
- Pallet label: Used when shipping palletized (LTL/FTL); helps identify pallets, but it’s not the same as carton labels.
- Unit label (often FNSKU): Goes on the individual sellable unit; it’s separate from carton labeling.
How to avoid the “I used the wrong label” trap:
- If your label preview shows a box ID / shipment ID style barcode, you’re likely in the right place for carton labels.
- If your label preview looks like a carrier shipping label with tracking, you may be in a carrier workflow (like “Buy Shipping”), not the FBA carton label flow.
- If your label is designed to stick on a product rather than a carton, it’s likely a unit label, not a shipment label.
Boundary conditions:
- Pallet labels mainly apply to palletized shipments; if you only ship small-parcel (SPD), you may never use pallet labels.
- Unit-label requirements can depend on your account settings and listing configuration—verify in your own workflow.
Supported FBA shipment label sizes for the US: minimum size, 4×6 thermal option, and letter sheets
In the US, most sellers handle FBA carton labels in one of two practical formats: a single 4×6 label on a thermal printer or a full-page PDF printed on US Letter (8.5×11) and applied as a label (or cut from a label sheet). The key is not the paper you own—it’s whether the printed label stays the correct proportions and remains scannable after handling.
What “supported” usually means in practice:
- 4×6 thermal format: Best when you can select a thermal option and print one label per carton quickly.
- 8.5×11 sheet printing: Works when you’re using a standard printer and label sheets, but it introduces more chances for scaling/cropping mistakes.
- Minimum size constraints (official details can change): Amazon may specify a minimum label size for shipment labels; if you plan to print “smaller than 4×6,” confirm the latest minimum in the official documentation before you buy supplies.
What matters more than the raw size:
- Correct proportions (no stretching)
- Adequate print clarity (barcode and text)
- Proper placement (flat surface, not over seams/edges)
Boundary conditions:
- “4×6 is required” is often overstated online; treat it as an operational preference unless your current official documentation says otherwise.
- Always verify in print preview: the label should appear as a clean, single label—not shrunk, clipped, or spread across pages.
4×6 vs 8.5×11: a quick decision guide for your printing setup
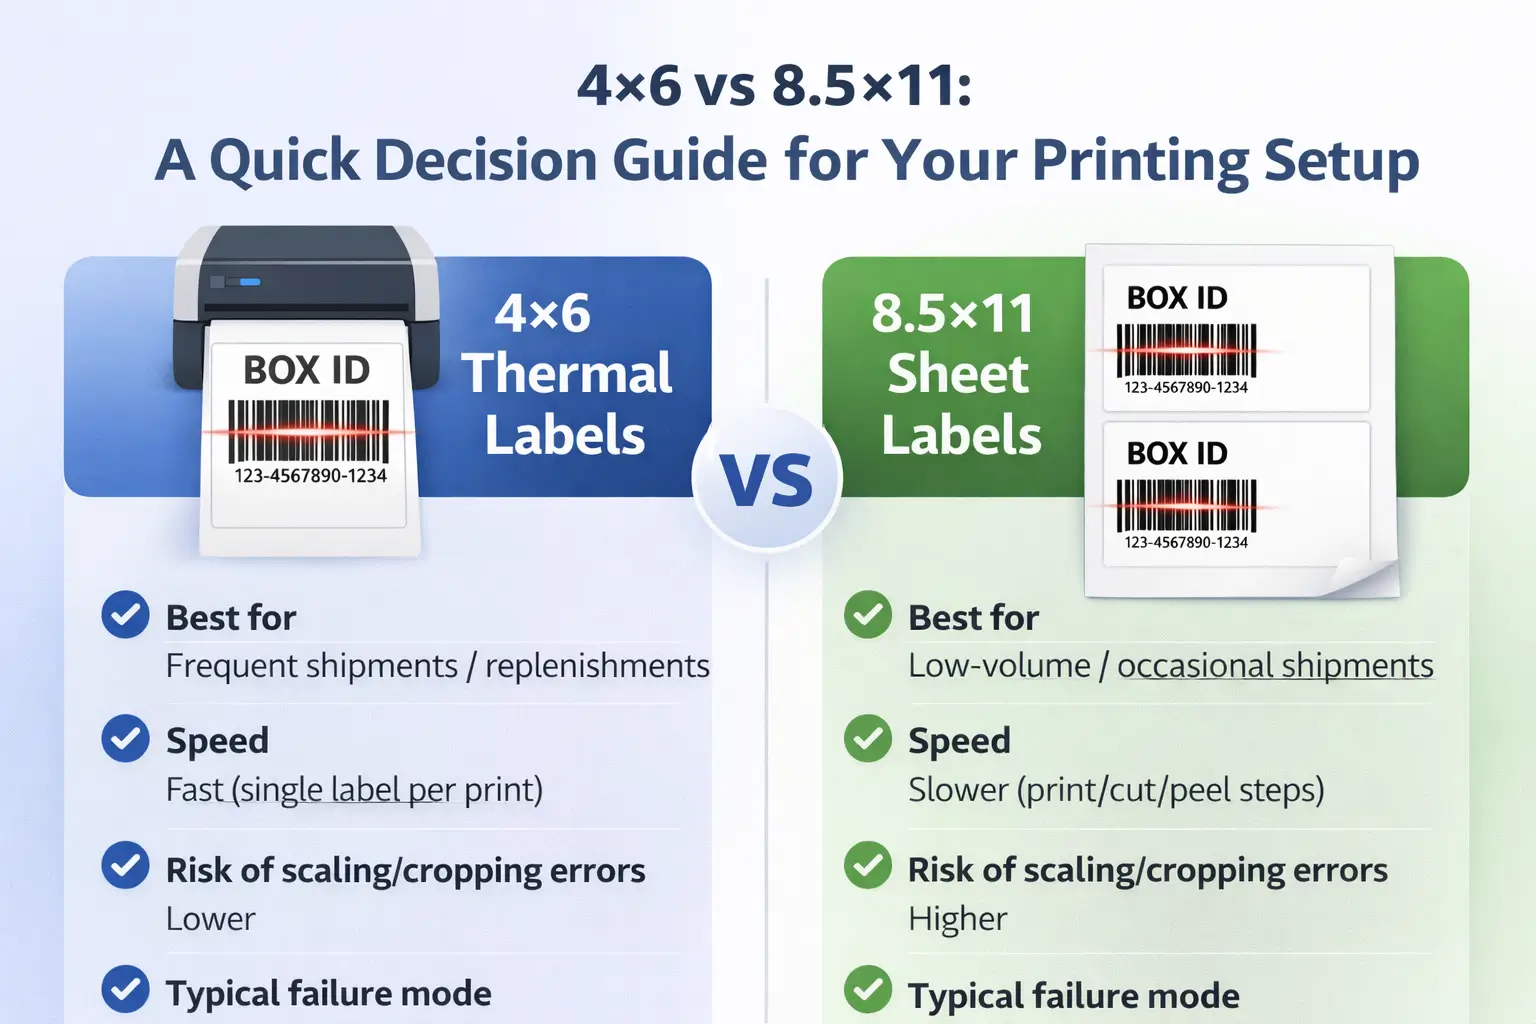
Now that you know the common formats, choose based on volume and repeatability: 4×6 thermal is usually the easiest to execute consistently at scale, while 8.5×11 can be perfectly fine for low-volume shipments if you control scaling and placement. The “best” option is the one you can print correctly every time without rework.
| Decision factor | 4×6 thermal labels | 8.5×11 (US Letter) sheets |
|---|---|---|
| Best for | Frequent shipments, replenishment-heavy sellers, teams printing lots of cartons | Low-volume/occasional shipments, small teams using existing printers |
| Speed | Fast (one label per print) | Slower (print/cut/peel steps) |
| Risk of scaling/cropping errors | Lower (if workflow truly outputs 4×6) | Higher (print dialog defaults can shrink/crop) |
| Typical failure mode | Wrong workflow selection (prints letter-size instead) | “Fit to page” or wrong paper size shrinks/cuts barcodes |
| Practical check | Preview shows a single 4×6 label with correct proportions | Preview shows label at actual size, not clipped, with clear barcode |
Boundary conditions:
- If multiple people share a printer, scaling settings can “drift” between print jobs—always check preview.
- Keep performance claims qualitative: the real win is fewer misprints and fewer relabel events, not a guaranteed outcome.
How to print FBA box labels in 4×6 without UI guesswork
If you want 4×6 labels, the repeatable method is: generate the correct carton label output in your FBA shipment workflow, select the thermal/4×6 option when available, and then confirm the print preview shows a single label at actual size. If your labels keep reverting to letter-size, the root cause is usually that you’re printing the wrong label type (carrier vs carton) or you didn’t select the thermal format for box labels.
Workflow-neutral steps (what to look for):
- Confirm you’re in the FBA shipment workflow where you print box/carton labels (not a carrier “Buy Shipping” workflow).
- Navigate to the step that prints box labels / carton labels / box IDs for the shipment.
- Look for a label format / paper type choice (often described as thermal or 4×6 vs letter).
- Select the thermal / 4×6 option (if it exists for your shipment type/account).
- Open the label PDF and check print preview:
- It should show one label per page.
- The barcode should not look stretched or compressed.
- In your print dialog, ensure scaling is off (often “Actual size” / “100%” / “No scaling”).
- Print one test label and verify readability (visual check, and scan if you can).
- Only then batch print the rest for the shipment.
Quick troubleshooting box (most common failures):
- “I can’t find 4×6.” You may be printing the wrong label type or the wrong step. Confirm you’re printing FBA box/carton labels (box ID), not carrier labels.
- “It prints letter-size even after selecting thermal.” Reopen the PDF and re-check print preview and scaling; some print dialogs remember old settings.
- “It prints but barcodes look tiny or clipped.” Fix scaling and paper size defaults (see the scaling checklist next).
Boundary conditions:
- Seller Central changes; the goal is to find the format selector and verify preview, not memorize a click path.
- If your workflow doesn’t offer a thermal format, you can still print on letter sheets—just treat scaling control as mandatory.
Print scaling & quality checklist: prevent cut-off, tiny labels, or unscannable barcodes
If labels are cut off, shrunk, or hard to scan, the fix is almost always in print preview and scaling settings—so the safest approach is a short checklist you run before batch printing. Your goal is simple: keep the barcode proportions correct and print with enough clarity to survive handling.
Scaling & output checklist (run this before batch printing):
- Confirm the PDF preview shows the label fully inside the page (no clipping).
- Set scaling to Actual size / 100% / No scaling (avoid “Fit” unless the official doc explicitly instructs it).
- Confirm the print dialog’s paper size matches your intended format (4×6 or 8.5×11).
- Avoid “draft” print modes; use a higher quality mode if available.
- Check barcode clarity: lines should look crisp, not fuzzy or broken.
- If using thermal printing:
- Ensure the print is dark enough (density) without “bleeding” lines together.
- Keep the print head clean if output starts fading.
- If using ink/laser:
- Avoid low-ink streaking that breaks barcode lines.
- Let ink dry before handling if smearing is possible.
- Print one test label and do a quick readability check (and scan if you have a scanner app/device).
- If anything looks off, stop and correct settings before printing the full run.
Boundary conditions:
- Printer drivers label settings differently; focus on the intent (“no scaling,” correct paper size, clear output) rather than exact button names.
- If you need to follow a numeric DPI requirement, confirm it in the latest official documentation rather than trusting third-party blogs.
Placement & handling checklist: where to stick labels so they still scan at receiving
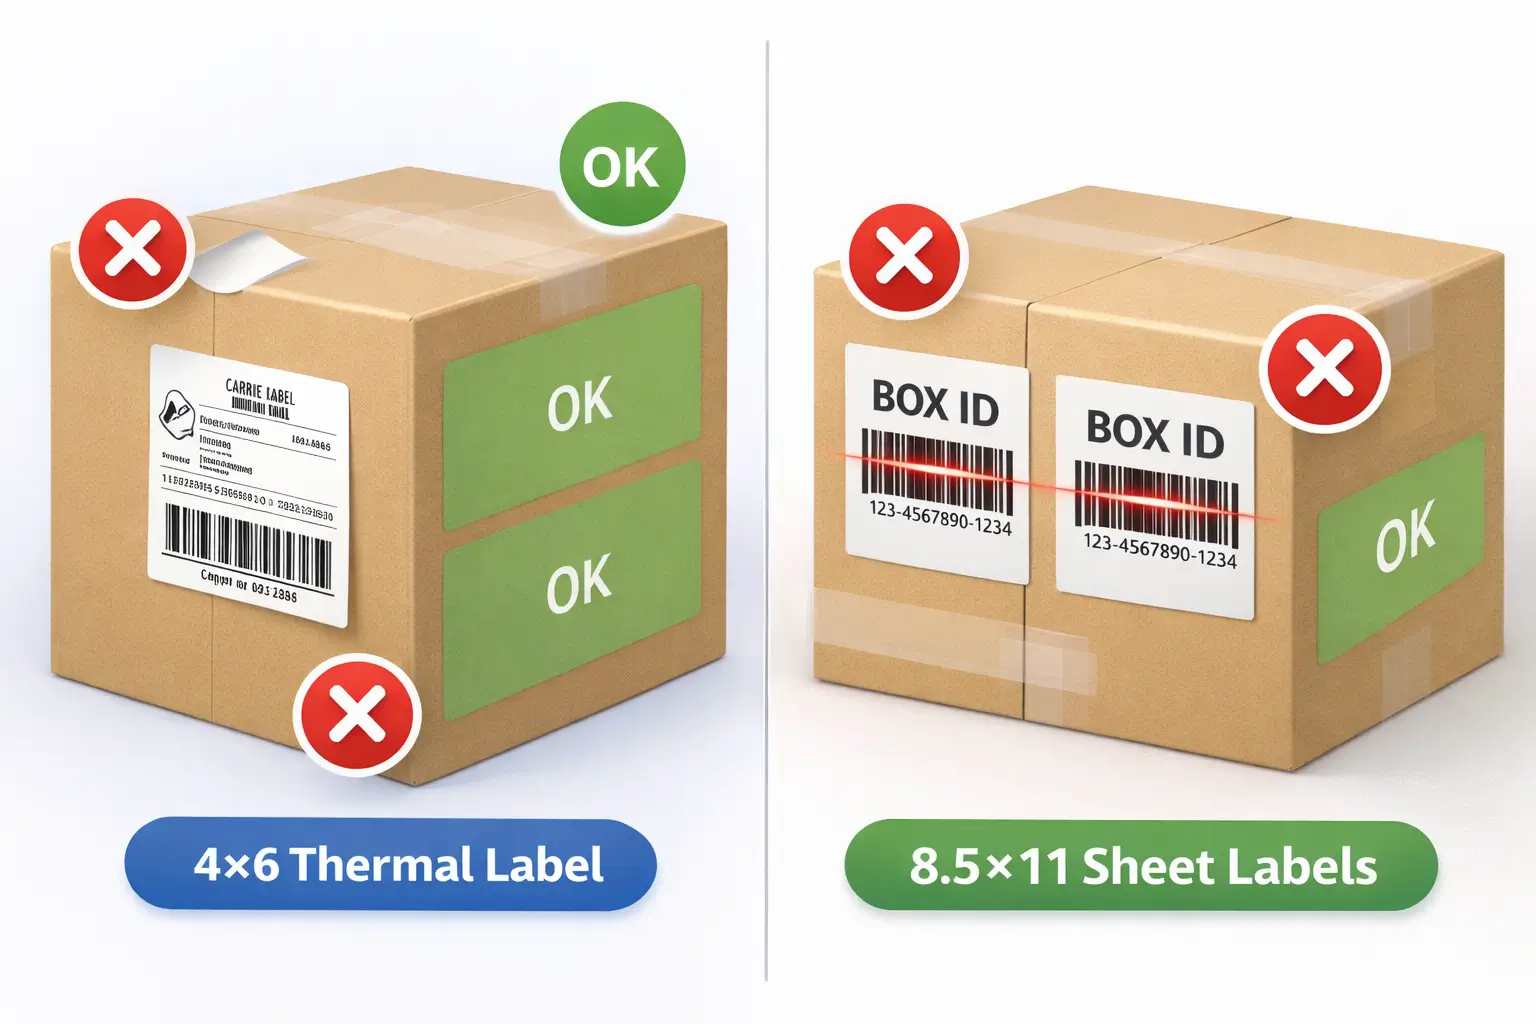
Once your label prints correctly, placement is the next biggest source of scan failures: labels placed over edges, seams, or corners can get folded or damaged in transit and become unreadable. The safest approach is to apply labels on a flat face of the carton and keep barcodes unobstructed.
Placement do’s (what usually works best):
- Place carton labels on a flat surface of the carton.
- Keep labels away from edges and seams where folding or abrasion can occur.
- Press firmly so corners don’t lift during handling.
- If you also apply a carrier label, place it so neither barcode overlaps and neither wraps around an edge.
Placement don’ts (common failure modes):
- Don’t place labels over a seam or straddling two panels.
- Don’t wrap barcodes around corners.
- Don’t place labels where straps, tape lines, or shrink wrap will cover the barcode.
- Don’t reuse cartons with old barcodes visible—remove or fully cover old labels to prevent mis-scans.
About tape or pouches (keep it conservative):
- Covering a barcode with glossy tape or placing it under wrinkled plastic can introduce reflection or distortion that makes scanning less reliable.
- If you need protection, verify what the current official guidance allows for barcode coverings and use a method that keeps the barcode flat and scannable.
Boundary conditions:
- If your official documentation specifies exact placement distances from edges/corners, follow that; otherwise default to “flat face, away from seams/edges.”
- When in doubt, prioritize scannability over aesthetics: clear, flat, unobstructed barcodes.
Quick troubleshooting: A4 vs US letter and other paper-size gotchas
If labels print too small or get cropped even after you set “no scaling,” the issue is often a paper-size mismatch: the PDF was generated for one page size but your printer dialog is set to another. In US workflows, the most common mismatch is A4 vs US Letter.
Fast fixes (no policy assumptions required):
- In print preview, check whether the label is centered and fully visible.
- Confirm the selected paper size is US Letter (8.5×11) when you’re printing on letter sheets.
- If your printer defaults to A4 (common outside the US), explicitly switch it and re-check preview.
- Re-check scaling after changing paper size—some dialogs reset scaling when paper size changes.
Boundary conditions:
- This is a US-focused article; treat A4 as a troubleshooting note, not a “marketplace rule.”
- Always trust print preview over assumptions: if it looks clipped, it will print clipped.
Using a prep center: when to outsource labeling and what to send so labels match the shipment
If labeling is becoming a bottleneck, outsourcing can make sense when your operation is complex (multiple suppliers, many SKUs, frequent replenishment) and errors are costly to fix later. The key is to outsource execution while keeping verification checkpoints so carton labels still match the shipment plan.
When outsourcing labeling usually helps:
- You consolidate inventory from multiple suppliers and need consistent carton planning.
- You ship frequently and want a repeatable process (less last-minute printing chaos).
- You’ve had repeated issues with misprints, wrong label types, or poor placement.
- Your team is stretched and labeling steals time from inventory planning.
What to send your prep partner (handoff checklist):
- Which shipment workflow you’re using (so they print the correct carton labels).
- Your carton plan (how many cartons, what’s in each carton, and any labeling variations).
- SKU identifiers needed to prevent unit/carton confusion (keep it clear and unambiguous).
- Any special handling notes that could affect label placement (carton shape, wrap, straps).
What you still verify (even when you outsource):
- The label type is correct (carton/box ID vs unit vs carrier).
- Print output is not scaled/cropped.
- Labels are placed on flat faces and barcodes are unobstructed.
- The carton plan hasn’t changed after labels were printed.
If you’re consolidating multiple suppliers and want fewer labeling surprises, FBABEE can coordinate carton planning + prep workflows so labels are printed and applied before outbound booking—without relying on last-minute fixes.
Boundary conditions:
- Outsourcing doesn’t remove accountability; it shifts who prints and applies labels, not who owns correctness.
- Avoid chasing “perfect”—chase “repeatable and verifiable.”
China → FBA labeling checkpoints: where label decisions must be locked to avoid rework
If you ship from China to FBA, the biggest labeling failures are timing failures: cartons get finalized after labels are printed, or suppliers ship cartons that don’t match the final plan. The safest workflow is to lock carton counts and labeling responsibilities before pickup and again before outbound booking.
A practical checkpoint timeline (labeling-focused):
- Supplier handoff: Confirm cartons, SKUs, and any unit-label needs (so cartons don’t change after planning).
- Consolidation receiving: Verify carton counts and carton condition before generating final shipment labels.
- Carton plan lock: Finalize how cartons map to shipment contents (avoid changing after label printing).
- Generate carton labels: Produce the correct carton/box ID labels from the shipment workflow.
- Print + apply + QC: Apply labels with placement rules and verify no scaling/cropping issues.
- Outbound booking: Only book and dispatch after label QC is complete (reduces “relabel later” scenarios).
- Exception handling: If carton counts change, treat it as a reprint trigger—reconfirm which labels must be regenerated.
Boundary conditions:
- Division of work varies (factory vs prep center vs forwarder warehouse); the checkpoints still apply even if the owner changes.
- This section is operational guidance, not customs/legal advice.
FAQ: shipment label size and printing (quick answers)
These answers are intentionally short—use them as a checklist to confirm you’re on the right track.
What size are Amazon FBA shipment (box/carton) labels supposed to be?
Most sellers print FBA carton labels either as 4×6 thermal labels or on US Letter (8.5×11) sheets, depending on printer and workflow options. If you plan to use a smaller format than 4×6, verify the current official minimum supported size in Seller Central before buying supplies.
Is 4×6 mandatory for FBA box labels, or can I print on 8.5×11?
4×6 is often the easiest option when the thermal label format is available, but 8.5×11 can work well if you print at actual size (no scaling) and keep the barcode proportions correct. Treat “mandatory” claims cautiously unless your current official documentation explicitly states it.
How do I change my box-label print setting back to 4×6 in the seller portal?
In the FBA shipment workflow, go to the step that prints box/carton labels, choose the thermal/4×6 format if available, then confirm print preview shows one label per page and set scaling to “Actual size/100%.” If it still prints letter-size, re-check you’re not printing carrier labels and re-check scaling.
What’s the difference between an FBA carton label and a carrier shipping label?
A carton/box ID label identifies the carton for Amazon receiving, while the carrier label routes the carton through transit (UPS/FedEx/DHL). Carrier labels don’t replace carton labels for shipment identification at receiving.
What print settings keep labels from being cut off or too small?
Use print preview, set scaling to “Actual size/100%,” confirm the correct paper size (4×6 or 8.5×11), and avoid draft/low-quality modes that break barcode lines. If the label looks clipped in preview, it will print clipped—fix that before batch printing.
Can I cover a box label with tape or put it in a pouch?
Covering barcodes with glossy tape or wrinkled plastic can reduce scan reliability due to reflection or distortion. If you need protection, verify current official guidance and choose a method that keeps the barcode flat and clearly readable.
Summary: the safest default setup and the quick checks that prevent relabeling
If you want the safest default, print carton labels in the format you can execute consistently (4×6 thermal if available; otherwise 8.5×11 with strict scaling control), and treat print preview + “no scaling” as non-negotiable checks. Pair that with placement discipline (flat face, away from seams/edges, no old barcodes) and you’ll eliminate the most common reasons labels fail after leaving your desk.
If you’re regularly shipping from multiple suppliers and want a repeatable “carton plan → print → apply → QC” workflow before freight booking, FBABEE can help coordinate consolidation and prep so labeling doesn’t become a last-minute risk.


