

If you’re shopping for a “best label printer,” you’re really trying to avoid one thing: buying a printer that doesn’t match the labels you actually need to print. This guide is written from an operations perspective (not affiliate hype), and FBABEE is not affiliated with Amazon—always verify your exact label prompts and settings inside your Seller Central workflow.
Table of Contents
- The best label printer setup for Amazon FBA (in 10 seconds)
- Step 1: Which FBA labels are you actually printing? (FNSKU vs carton vs pallet)
- Step 2: Choose a printer by workflow (decision table, not a “top 10” list)
- Can one printer handle both 4×6 shipping labels and small FNSKU labels?
- Direct thermal vs thermal transfer: when it matters for FBA labels
- 4×6 vs 8.5×11/A4: choosing the right Seller Central label format
- First successful print checklist (drivers → preview → batch print)
- Barcode scanability essentials (DPI, darkness, label stock, scaling)
- Troubleshooting table: cut off, shifted, too light, or blurry
- Supplies & setup options: roll vs fanfold, USB vs wireless, Mac notes
- DIY vs outsource labeling: when an FBA prep partner makes sense
- FAQ
- Summary: your next 3 steps
The best label printer setup for Amazon FBA (in 10 seconds)
If you just want the default answer before reading details, start with your label job. For most FBA sellers who print lots of 4×6 shipment (carton/box) labels, a direct-thermal 4-inch label printer is the lowest-friction setup.
Mini decision table (pick the row that matches your reality):
| Your situation | What to buy (traits, not brand hype) | Why it works | What to verify before you buy |
|---|---|---|---|
| Mostly printing 4×6 shipment/carton labels | Direct-thermal 4-inch (4×6) printer, reliable USB connection | Fast, low consumables (no ink/toner), designed for 4×6 workflows | In Seller Central, you can select the thermal/4×6 format for the label you’re printing. |
| Printing a lot of small unit/FNSKU labels | A setup that supports your actual unit label size (often a separate workflow) | Small labels are more sensitive to sizing, alignment, and print quality | Your unit label size(s) and whether you’ll print them on thermal or on letter/A4 sheets |
| Mixed: 4×6 shipment labels and frequent unit labeling | Treat it as two workflows (4×6 for shipments + a unit-label workflow) | Prevents constant label-roll swaps, misprints, and wasted time | Whether one printer can reliably handle both sizes without reconfiguring every batch |
Fast setup rules that prevent most misprints:
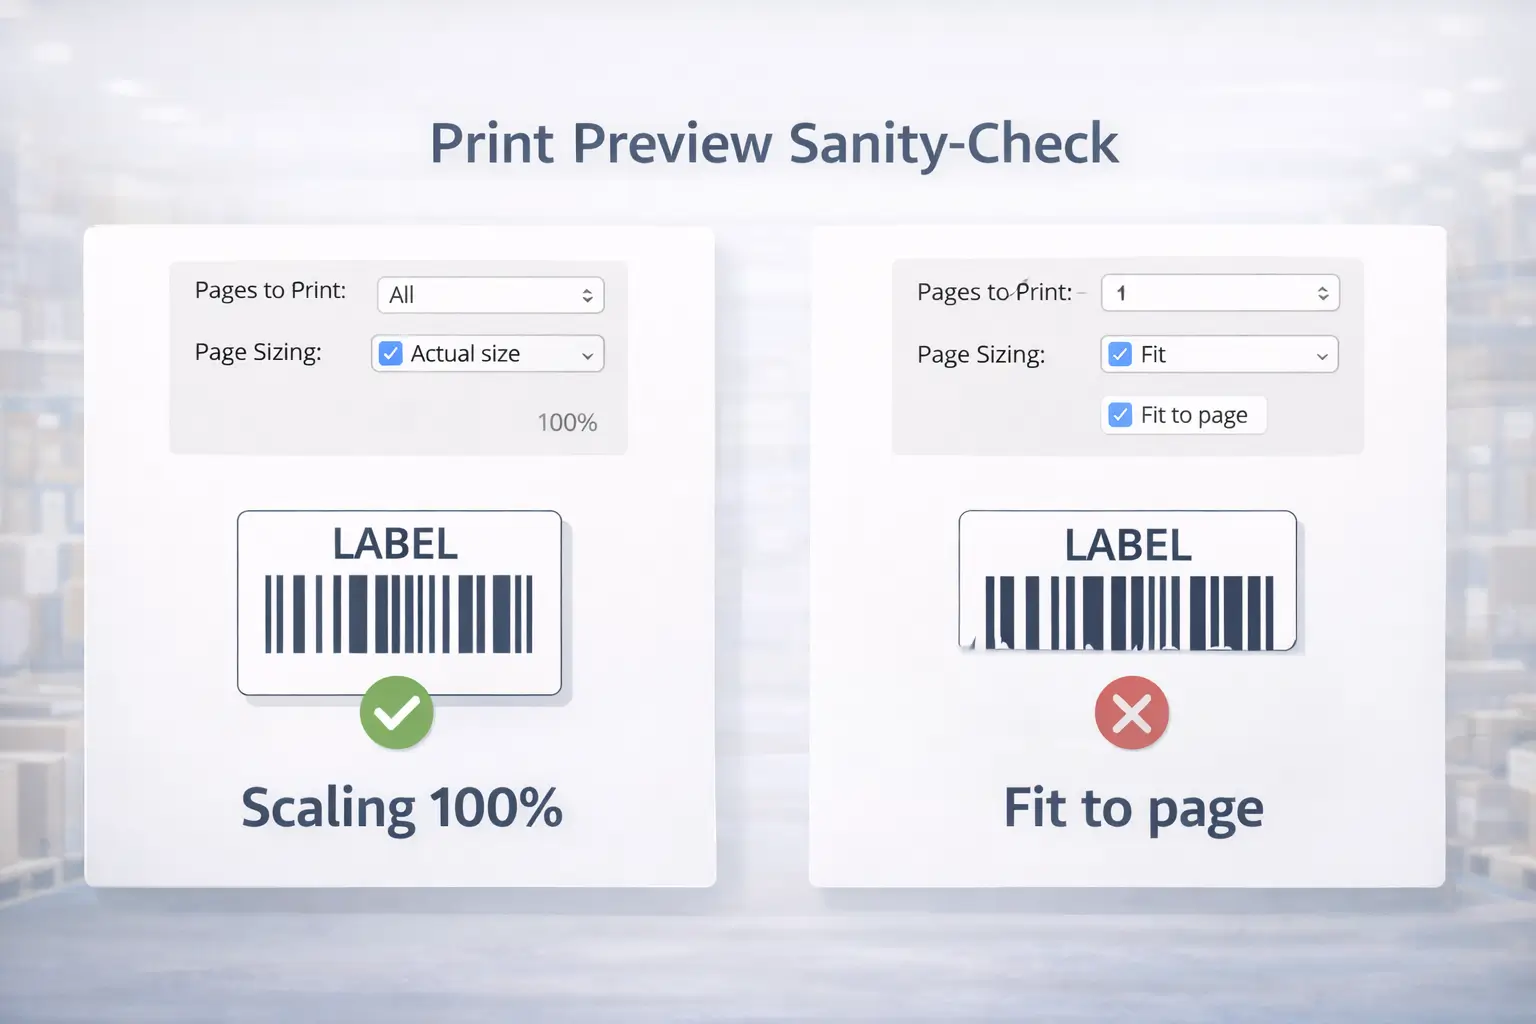
- Verify the output size in print preview before batch printing (don’t rely on memory—menus change).
- Disable “fit to page” / scaling, and print at 100% when your preview indicates cropping or shifting risk.
- Print one test label, scan/check sharpness, then run the full batch.
Independence note: This is practical guidance, not an “Amazon-approved printer list.” Amazon’s label requirements and UI options can change—verify your current workflow prompts in Seller Central.
Step 1: Which FBA labels are you actually printing? (FNSKU vs carton vs pallet)
To choose the right printer, you first need to know which label types you’re responsible for in your workflow. In practice, most FBA sellers deal with some mix of unit-level barcodes (often Amazon barcodes/FNSKUs), carton/box labels, and sometimes pallet labels, depending on how they send inventory to Amazon.
Two important boundaries before the cheat sheet:
- Amazon’s labeling prompts can vary by program and settings, so treat this as a planning guide and verify in Seller Central for your exact shipments.
- Amazon has published upcoming FBA barcode requirement changes effective March 31, 2026; if you’re building processes now, it’s worth checking the current guidance in Seller Central.
Label cheat sheet table (what it is, where it goes, who applies it, common mistake)
This table is the quickest way to avoid buying a printer that solves the wrong problem. The “printer implication” column is here to connect labeling reality to hardware decisions.
| Label type | Where it’s used | Who typically applies it | Common mistake | Printer implication |
|---|---|---|---|---|
| Amazon barcode / FNSKU (unit label) | On individual sellable units (when Amazon barcode is required/used) | Seller, factory, or prep partner (or Amazon labeling service if eligible) | Label covers another scannable barcode or is placed inconsistently | You need a workflow that prints the unit label size you actually use (often not 4×6). |
| Manufacturer barcode (UPC/EAN/GTIN) | Already on retail packaging (when allowed) | Manufacturer | Assuming it’s always acceptable without checking your current settings | Verify barcode choice rules for your account/products; requirements may change. |
| Carton/box (shipment) labels | On shipping cartons going to Amazon | Seller / warehouse / prep partner | Printing the wrong format (letter/A4) or scaling, causing cropped barcodes | A 4×6 thermal workflow is typically the smoothest for high-volume carton labels. |
| Pallet labels | On pallets (if shipping palletized freight) | Seller / warehouse / prep partner | Inconsistent placement or wrong label format | Often benefits from a thermal workflow; confirm label options in your shipment setup. |
Label paper quality matters more than people think. For Amazon barcodes specifically, Amazon states requirements like printing in black on white, non-reflective labels and using removable adhesive (among other constraints).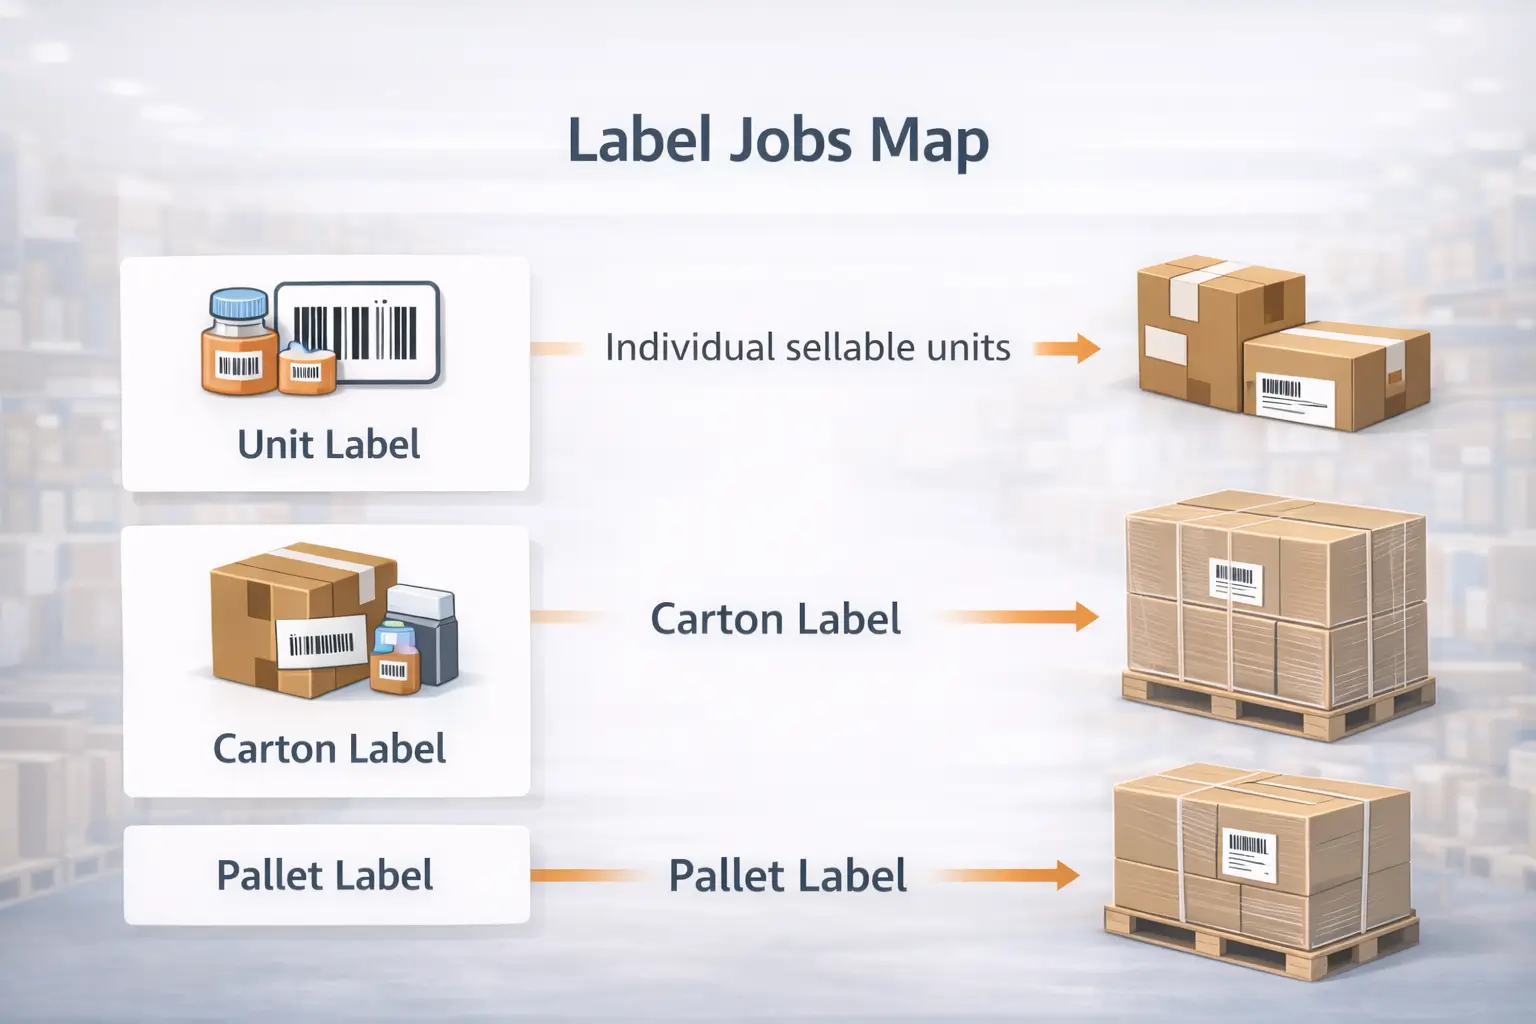
Step 2: Choose a printer by workflow (decision table, not a “top 10” list)
Now that you know what you’re printing, the “best” printer becomes a workflow match, not a popularity contest. For most sellers doing regular replenishments with 4×6 shipment labels, a direct-thermal 4-inch printer is the most straightforward day-to-day choice because it’s built for that label size and volume.
What to prioritize (traits that actually reduce rework)
- Label width support: If you mainly print 4×6, you want a printer designed for 4-inch media; if you need small unit labels, confirm supported sizes.
- Connection reliability: USB tends to be the stable baseline in warehouse workflows; wireless can be convenient but adds failure modes (dropouts, driver quirks).
- “Preview-first” printing: Your printer can be great, but if your print dialog scales or crops the label, your output still fails.
- Supply flexibility: Proprietary-only labels can be fine—until you run out during a shipment push.
- Operational overhead: The “best” setup is the one your team can run without constant recalibration.
Decision table: common FBA scenarios → recommended printer traits
Use this to shortlist options quickly (no model wars, no fake benchmarks).
| Scenario | Recommended printer traits | Why it’s the right “best” | Watch-outs |
|---|---|---|---|
| Beginner, low-to-mid volume, mostly carton labels | Direct-thermal 4-inch, USB, simple driver setup | Minimizes consumables and setup complexity | Confirm you can select the thermal/4×6 format where you print shipment labels. |
| Growing brand, frequent replenishments, high carton volume | Direct-thermal 4-inch, stable workflow, spare labels on hand | Time saved on printing and fewer reprints compound quickly | Standardize print settings; train staff on preview checks |
| Heavy unit labeling (many SKUs needing FNSKU/unit labels) | Unit-label workflow that matches your label size(s); consider separating from 4×6 | Small labels are more sensitive; swapping roll sizes can waste time | Validate placement rules and label stock requirements for Amazon barcodes. |
| Mixed workloads (unit + carton labels every week) | Two workflows (4×6 shipments + unit labels) | Prevents constant reconfiguration and misprints | Decide who labels units: you, factory, prep partner, or Amazon service. |
Can you use a regular inkjet/laser printer? You can, especially if you’re printing on letter/A4 sheets, but many sellers move to thermal for 4×6 workflows because it reduces ongoing friction (paper waste, cutting, and “wrong scale” surprises). Keep it as an acceptable starting point, not a forever decision.
Can one printer handle both 4×6 shipping labels and small FNSKU labels?
If you’re trying to keep your setup simple, you’re asking the right question. The practical answer is: sometimes, but it’s usually smoother to treat 4×6 shipment labels and small unit labels as two workflows—especially once unit labeling becomes frequent.
When one printer can work
- Your “small labels” are still within the printer’s supported media range and are easy to switch without re-calibrating.
- You label units occasionally (not every replenishment), so the switching overhead doesn’t matter.
When it becomes painful
- You’re swapping label rolls often (and re-calibrating sensors or settings).
- You’re managing multiple unit label sizes across SKUs.
- Misprints cost you real time because you’re labeling hundreds of units.
A realistic compromise
- Keep a stable 4×6 thermal workflow for carton/shipment labels.
- Use a separate unit-label workflow (either another printer, a print service, a factory/prep partner, or Amazon’s labeling service where eligible).
This “two workflows” approach isn’t about buying more gear—it’s about reducing rework when your business grows.
Direct thermal vs thermal transfer: when it matters for FBA labels
If you’re already committed to thermal printing, the next decision is print method—not brand. In plain terms: direct thermal is simpler and often sufficient for common shipment-label workflows, while thermal transfer becomes useful when labels must resist heat, sunlight, or abrasion over time.
Compare (keep it practical)
- Direct thermal
- Pros: No ribbon, simpler operation, fewer supplies.
- Cons: Heat- and light-sensitive media can be less suitable for harsh environments.
- Thermal transfer
- Pros: Typically more durable prints due to ribbon transfer.
- Cons: Ribbon management adds complexity and ongoing supply needs.
Risk checklist: choose thermal transfer if your labels will likely face
- Long exposure to heat/sunlight (e.g., extended storage in hot conditions)
- High abrasion (labels rubbing against other cartons frequently)
- A need for longer-lasting readability beyond typical shipment windows
If you’re unsure, start with the simplest workflow that meets your needs, then upgrade durability only if your operations show it’s necessary.
4×6 vs 8.5×11/A4: choosing the right Seller Central label format
Once your printer choice is set, “format” becomes the next make-or-break point. If you have a thermal printer, Amazon’s Seller Central help indicates you can print shipping labels in a 10 × 15 cm (4 × 6 inch) format by selecting the thermal printing option in the relevant label-printing step.
Steps: select the right label format and sanity-check in print preview
These steps are intentionally “tool-agnostic” because UI labels can change, but print preview doesn’t lie.
- In your label printing step, select the thermal printing paper / 4×6 option when available for the label you’re printing.
- Open the PDF (or label output) and go to print settings.
- In the print dialog, disable “fit to page” and set scaling to 100% if your preview shows cropping, shifting, or unexpected margins.
- Print one label first and confirm:
- no elements are cut off
- barcodes are crisp, not stretched
- the label matches the physical 4×6 media
- Only then print the full batch.
If your “default format” keeps switching: treat it as a settings problem, not a printer problem. Re-check (a) label option selected in Seller Central, (b) print dialog scaling, (c) paper size preset, and (d) whether your OS is remembering old defaults.
First successful print checklist (drivers → preview → batch print)
If you want a setup that your team can run without drama, you need a repeatable sequence. The fastest path is: install correctly → set the right label preset → validate in preview → print one test label → then batch print.
Checklist: the fastest path to a correct first print
- Install the correct driver/software for your printer and OS (Windows/macOS).
- Set the correct paper/label size preset (e.g., 4×6 for shipment labels).
- Load labels correctly (roll direction, sensor position) and run calibration if your printer supports it.
- In Seller Central, choose the thermal/4×6 option where available for the label type you’re printing.
- Print a single test label and confirm:
- no cropping
- correct alignment
- crisp barcodes (not blurry or broken edges)
- Lock in print dialog settings:
- scaling off / 100%
- correct paper size
- Batch print, then re-check one label at random every so often (quick quality habit).
If your output looks wrong, stop and troubleshoot before you waste an entire roll of labels.
Barcode scanability essentials (DPI, darkness, label stock, scaling)
After you can print the right size, scanability is the quality bar that keeps you from relabeling later. The goal is simple: clean edges, correct sizing, and enough contrast for reliable scanning.
Scanability checklist (practical, not spec-chasing)
- Use compliant label stock for Amazon barcodes (Amazon specifies requirements such as black on white, non-reflective labels and removable adhesive).
- Prioritize print clarity: GS1 guidance emphasizes high-resolution artwork and high-resolution printing to keep bars/spaces clean and readable.
- Adjust darkness/heat until barcodes look solid without “bleeding” into adjacent spaces (too dark can be as bad as too light).
- Avoid scaling that stretches barcodes—scaling is a top silent killer of scanability.
- Match print quality to label size: smaller, denser barcodes are more sensitive than large shipment labels.
- Do a quick scan test when possible (helpful for obvious problems; not a formal verifier).
Troubleshooting table: cut off, shifted, too light, or blurry
If labels print wrong, random fiddling wastes time. The fastest fix is usually in one of three places: print scaling, paper size preset, or calibration/driver.
Decision table: symptom → likely cause → fastest fix
| Symptom | Likely cause | Fastest fix (do in this order) |
|---|---|---|
| Label is cropped (top/bottom missing) | “Fit to page” scaling or wrong paper size | Set scaling to 100%; confirm 4×6 preset; print one test label. |
| Output is shifted left/right | Paper size mismatch or sensor not calibrated | Confirm label size preset; recalibrate sensor; re-check preview |
| Print is too light (barcode faint) | Darkness too low or label stock mismatch | Increase darkness slightly; check label type; print test label; avoid glossy stock for barcode labels |
| Print is blurry or edges look “melted” | Darkness too high or speed/heat mismatch | Reduce darkness; ensure correct driver; print test label |
| Size is right but barcode won’t scan | Contrast/quiet zone issues or scaling distortion | Re-check scaling; reprint at 100%; use non-reflective label stock; confirm crisp edges |
Preview-first habit: after any change, re-check print preview and print one label before you run a batch.
Supplies & setup options: roll vs fanfold, USB vs wireless, Mac notes
Once you’re printing reliably, these choices determine whether labeling feels smooth or annoying long-term. As a baseline: USB is usually the stable “ops choice,” while wireless is a convenience upgrade that can add troubleshooting overhead.
Roll vs fanfold (quick decision)
- Choose roll labels if you have space for the roll and want a tidy setup.
- Choose fanfold labels if you want to reduce roll swaps, store labels flat, or feed from a box behind the printer.
Proprietary vs universal labels
- Proprietary supplies can be convenient, but confirm you can source them quickly during busy weeks.
- Universal supplies give flexibility; just ensure they meet label quality needs for scannability.
Mac notes (keep expectations realistic)
- Driver and print-dialog defaults matter; most “mystery scaling” issues are print settings, not the printer.
- Make your workflow “preview-first” and document working presets so you can recreate them after OS updates.
DIY vs outsource labeling: when an FBA prep partner makes sense
If DIY labeling is costing you repeated rework, outsourcing becomes a practical operations decision. In general, outsourcing makes sense when your label workload or shipment complexity is high enough that setup time, misprints, and coordination cost more than the labeling itself.
Common scenarios where outsourcing becomes the “best” move
- Multi-supplier sourcing that requires consolidation before shipping
- Multi-SKU inbound shipments where carton planning and label accuracy matter
- Kitting/bundles or inserts that increase prep complexity
- Limited staff time (labeling becomes the bottleneck)
- High-value shipments where trial-and-error mistakes are too expensive
Outsourcing options to know about
- Amazon offers an FBA Label Service option for eligible products (you’re still responsible for ensuring requirements are met and for choosing the right option).
- Third-party prep partners can label, kit, and prep according to your instructions (quality depends on clarity and checks).
Handoff checklist: what to send a prep partner for correct labeling
If you outsource, treat the handoff like a process—not a casual message.
- SKU list + exact barcode approach per SKU (Amazon barcode/FNSKU vs manufacturer barcode)
- Unit label files (or clear instructions on where the partner should generate them)
- Label placement rules (where on the unit/carton, and what not to cover)
- Carton contents plan (what SKUs and quantities per carton)
- Exceptions list (bundles, fragile items, polybag needs, or any special prep rules)
- A “sample first” request: ask for photos of one labeled unit/carton before full-run labeling
If your shipments involve multiple Chinese suppliers (consolidation + carton planning + labeling), a China-side prep partner can reduce rework by standardizing receiving, labeling, and outbound prep before freight. FBABEE supports consolidation, FBA prep, and door-to-door shipping—reach out if you want to compare a DIY vs outsource plan for your next replenishment.
FAQ
What labels do I need for Amazon FBA—product labels, box labels, or both?
Here’s the short answer based on how FBA workflows typically split labeling. You may need unit labels, carton labels, or both, depending on your barcode choice and how you send inventory.
Q: What labels do I need for Amazon FBA—product labels, box labels, or both?
A: Many sellers print carton/shipment labels for inbound boxes, and some also need unit labels (often Amazon barcodes/FNSKUs)—verify your exact prompts and barcode rules in Seller Central because requirements can vary and are changing over time.
What’s the best label printer type for Amazon FBA beginners?
If you’re new, it’s smart to optimize for simplicity first. The safest default for beginners who mainly ship cartons is a direct-thermal 4×6 workflow, then add a separate unit-label workflow only if you truly need it.
Q: What’s the best label printer type for Amazon FBA beginners?
A: If you mostly print 4×6 shipment labels, a direct-thermal 4-inch label printer is typically the lowest-friction choice; if you also need lots of unit labels, confirm your unit label sizes or plan two workflows.
How do I change Amazon label format to 4×6 instead of 8.5×11?
If your output is the wrong size, treat it as a format + print-dialog issue first. When available, Amazon’s help indicates you can select thermal printing to print in 4×6 (10×15 cm) for shipping labels.
Q: How do I change Amazon label format to 4×6 instead of 8.5×11?
A: Select the thermal/4×6 option where available for that label type, then print with scaling at 100% (no “fit to page”) and validate in print preview before batch printing.
Why are my FBA labels printing cut off or misaligned?
Most cut-off and misalignment problems come from scaling or paper-size presets. Fixing “fit to page” and confirming your label size preset resolves a large share of these issues.
Q: Why are my FBA labels printing cut off or misaligned?
A: First disable scaling (“fit to page”), set 100%, confirm the correct label size preset (like 4×6), print one test label, then recalibrate your printer sensor if alignment still drifts.
Do I need 203 DPI or 300 DPI for scannable FBA barcodes?
This decision matters most for small, dense barcodes. For large shipment labels, the bigger risk is usually scaling/cropping—not DPI.
Q: Do I need 203 DPI or 300 DPI for scannable FBA barcodes?
A: 203 DPI is often sufficient for larger shipment labels, while 300 DPI can help with smaller unit labels where edge clarity matters—either way, prioritize crisp printing and avoid scaling distortions.
Can I print Amazon FBA labels on a regular inkjet/laser printer?
You can start that way, especially for low volume. The trade-off is that the workflow often becomes more manual and easier to mis-scale compared with a dedicated 4×6 thermal setup.
Q: Can I print Amazon FBA labels on a regular inkjet/laser printer?
A: Yes—especially if you print on letter/A4 sheets—but if you print frequently, a dedicated thermal 4×6 workflow usually reduces daily friction (fewer reprints and fewer sizing surprises).
When should I outsource labeling to a prep center instead of doing it in-house?
If labeling is becoming the bottleneck or the source of repeated mistakes, outsourcing can be rational. The key is to outsource with a clear handoff checklist rather than hoping the partner “figures it out.”
Q: When should I outsource labeling to a prep center instead of doing it in-house?
A: Outsource when volume or complexity (multi-SKU, multi-supplier, kitting) makes DIY setup and rework costly—outsourcing reduces workload, but you still need clear instructions and checks (it’s not a guarantee).
What’s the fastest setup checklist to print correctly from Seller Central?
The fastest path is a repeatable sequence, not trial-and-error. Preview-first printing plus one test label prevents most wasted batches.
Q: What’s the fastest setup checklist to print correctly from Seller Central?
A: Install the correct driver, set the correct label preset (e.g., 4×6), select the thermal option where available, print one test label, confirm preview/scaling at 100%, then batch print.
Summary: your next 3 steps
If you want the shortest path to “working labels,” follow this order. Decide your label job first, then lock your format, then standardize your print routine.
- Identify your label jobs: unit labels (if needed) vs carton labels (almost always).
- Choose a workflow-matching printer setup: don’t chase “best,” chase “least rework.”
- Standardize printing: thermal/4×6 option where available + preview-first + one test label before batching.
If you’re planning a China-to-FBA shipment with multiple suppliers, labeling often ties directly to consolidation and carton planning. FBABEE can help you map a low-rework inbound workflow (receiving → prep/labeling → carton planning → freight) so you spend less time fixing preventable issues.


