

If you’re searching “Amazon FNSKU label size,” you’re usually trying to avoid two expensive problems: printing labels that don’t line up with your stock, and getting barcodes that won’t scan reliably at receiving. The fastest path is to standardize one template, print at 100% (no scaling), and apply labels on a flat, scannable surface—then add a light QC loop before inventory leaves your factory or prep team.
What an FNSKU label is (and what “barcode preference” changes)
An FNSKU label is Amazon’s barcode label used to identify a specific seller’s inventory for a product; whether you need it depends on how Amazon expects units to be barcoded (Amazon barcode vs manufacturer barcode) for your offer and workflow. Amazon’s labeling requirements and eligibility rules can change over time, so treat “barcode preference” as a setting you should confirm inside your Seller Central account before you print thousands of labels.
In practice, the question you’re answering is simple: Will my units be received using a manufacturer barcode (UPC/EAN) or an Amazon barcode label (FNSKU)? If it’s Amazon barcode labeling, you need a scannable FNSKU label on each unit (or on the outside of any required prep layer).
Boundary notes
- Seller Central screens and eligibility rules vary by account and can change; verify the current guidance you see in your own workflow.
- This guide is independent and not affiliated with Amazon.
Fast Answer Box: FNSKU label size, templates to pick, and the “no scaling” checkpoint
If you’re labeling for Amazon barcode (FNSKU), the safest standard is to pick a Seller Central-supported label template that matches your label stock and print at 100% (no scaling) so the barcode retains its proportions and whitespace. Amazon guidance commonly references a usable label size range and also lists popular sheet templates sellers use in volume; the key is matching template → stock → print settings.
Quick sizing guidance (template-first, not “one mandatory size”)
- Commonly referenced label size range: about 1″×2″ up to 2″×3″ (as a practical scannable range in Amazon guidance discussions).
- Common “default” sheet template in the US: 30-up on US Letter (1″×2-5/8″)—widely used because it’s a standard sheet label format and appears in Amazon template lists.
- Non-negotiable checkpoint: Print without scaling / at 100% (don’t “shrink to fit”).
Mini-table: pick a template that matches your stock (start here)
| If you print on… | Start with… | Why it’s a safe default |
|---|---|---|
| US Letter sheets | 30-up 1″×2-5/8″ | Common, easy to standardize; widely supported in labeling workflows |
| A4 sheets | An A4 “multi-up” template that matches your A4 stock | Avoids misalignment caused by Letter/A4 mismatch |
| Thermal rolls | A thermal label size your printer + roll stock is built for | Best for higher volume if print quality is consistent (validate first) |
If your packaging is small or curved: treat it as a scannability + placement problem (whitespace, contrast, flat surface), not as permission to arbitrarily shrink the barcode.
Pick a template that matches your label stock (US Letter, A4, and thermal options)
The best “label size” is the one you can standardize across your workflow (factory, China consolidation warehouse, or prep center) without constant template switching. Start by standardizing the paper/roll type, then pick the matching Seller Central label format so what you print actually lands inside the label borders.
Here’s a practical decision guide:
| Workflow reality | Best starting option | Trade-off to manage |
|---|---|---|
| Low-to-medium volume, multiple people printing | Sheet labels (Letter/A4) | More chances of “wrong template” misalignment unless you standardize one format |
| High volume or dedicated labeling station | Thermal rolls | Requires consistent print settings + QC (contrast/whitespace) to avoid scan failures |
| Multiple suppliers labeling for you | One single standard template + “no scaling” rule | Needs a simple QC handshake (test print + photo proof) to prevent mismatches |
Common sheet templates (US Letter and A4) and how to avoid misalignment
If you print on sheets, misalignment is usually caused by template-stock mismatch (e.g., selecting a Letter template but printing on A4, or selecting the wrong “multi-up” format). The fix is boring but effective: test-print one page, verify alignment, then print the batch at 100%.
Misalignment prevention checklist
- Print a single page first and confirm the barcode sits fully inside each label border.
- If it’s off, change the label format/template—don’t “scale to fit.”
- Keep one shared standard: “We use X template + print at 100%.”
Thermal labels: when they make sense (and what to standardize)
Thermal labels can be a great choice when you need speed and consistency, but they only work well when you standardize (1) roll size, (2) printer settings, and (3) QC checks so barcodes are dark, crisp, and surrounded by enough whitespace. Amazon-facing labeling guidance commonly emphasizes print quality and scannability—thermal helps when it’s set up correctly, not simply because it’s “thermal.”
Boundary note: printer vendors and blogs can be helpful for setup tips, but treat them as common practice—not policy.
How to print FNSKU labels in Seller Central (without misalignment)
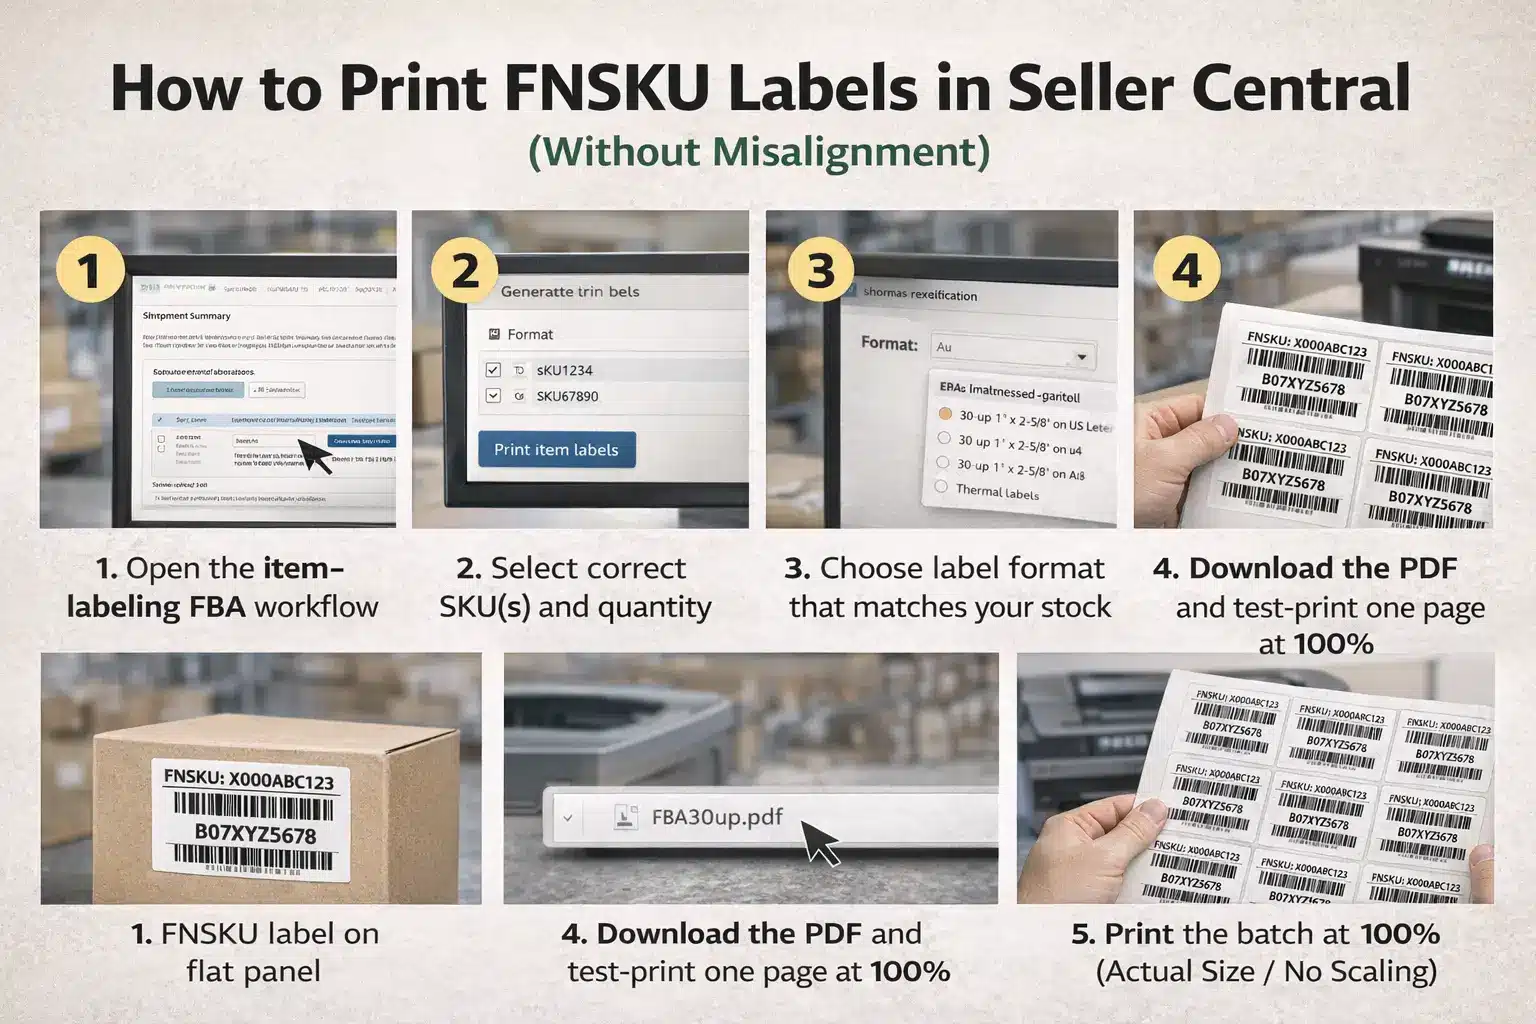
To print FNSKU labels reliably, you need two things: the correct label file for the correct SKU/shipment context, and print settings that preserve size and whitespace (100% / no scaling).
Step-by-step: generate and download FNSKU labels (repeatable workflow)
Use this UI-agnostic flow (wording varies, but the logic stays the same):
- In Seller Central, open the workflow where you print item labels for FBA (often within your shipment creation/management steps).
- Select the correct SKU(s) and label quantity for the units you’re actually shipping.
- Choose the label format/template that matches your physical label stock (Letter/A4/thermal).
- Generate and download the label PDF.
- Before printing in bulk, open the PDF and confirm alignment and readability at 100%.
Hidden failure mode: printing the “right looking” label for the wrong SKU. If you work with multiple suppliers or similar-looking variants, build a quick SKU-to-label spot check into your process.
Print settings checklist: “100% / no scaling” and what to verify before mass printing
Once you have the PDF, the safest print checklist is:
- Scale: 100% / “Actual size” / “No scaling” (never “Fit to page”).
- Alignment: barcode sits fully inside the label border on your test print.
- Contrast: barcode is crisp and dark enough to scan (avoid smudges or light gray bars).
- Stop-the-line rule: if alignment is off, change the template/format—don’t fix it by scaling.
Scannability rules that matter more than “size” (whitespace, contrast, resizing)
If your label “fits” but still causes problems, the issue is usually scannability: whitespace (quiet zone), contrast, and distortion from scaling. Amazon staff guidance in Seller Forums emphasizes keeping required label elements and maintaining minimum whitespace around the barcode when resizing.
Resizing labels: the safe way to think about small or awkward packaging
If you must resize (because the package is small), treat it as a controlled exception:
- Keep the barcode crisp and undistorted (no scaling tricks that squash the bars).
- Preserve whitespace around the barcode; Amazon guidance discussions reference minimum whitespace on each side and top/bottom.
- Don’t “solve” small packaging by placing the label on a curve or corner—placement can be worse than resizing.
- Test-print and do a quick scan check (even a simple handheld scan test) before mass labeling.
Common scan-failure causes (quick troubleshooting checklist)
Use this checklist when labels won’t scan reliably:
- Scaled print / “fit to page” used at print time (common and avoidable).
- Not enough whitespace around the barcode (quiet zone compromised).
- Low contrast or smudging (bar lines not crisp).
- Wrinkled label / label over seams, edges, or corners (barcode distortion).
- More than one scannable barcode visible (receiver scans the “wrong” one).
Placement rules: where to put the label and how to handle UPC/EAN
Place the FNSKU label on a flat, easily scannable surface, and cover any other scannable barcodes (like a UPC/EAN) completely to prevent mis-scans. Amazon’s labeling quick reference guidance calls out both placement discipline and barcode coverage as core requirements for unit labeling.
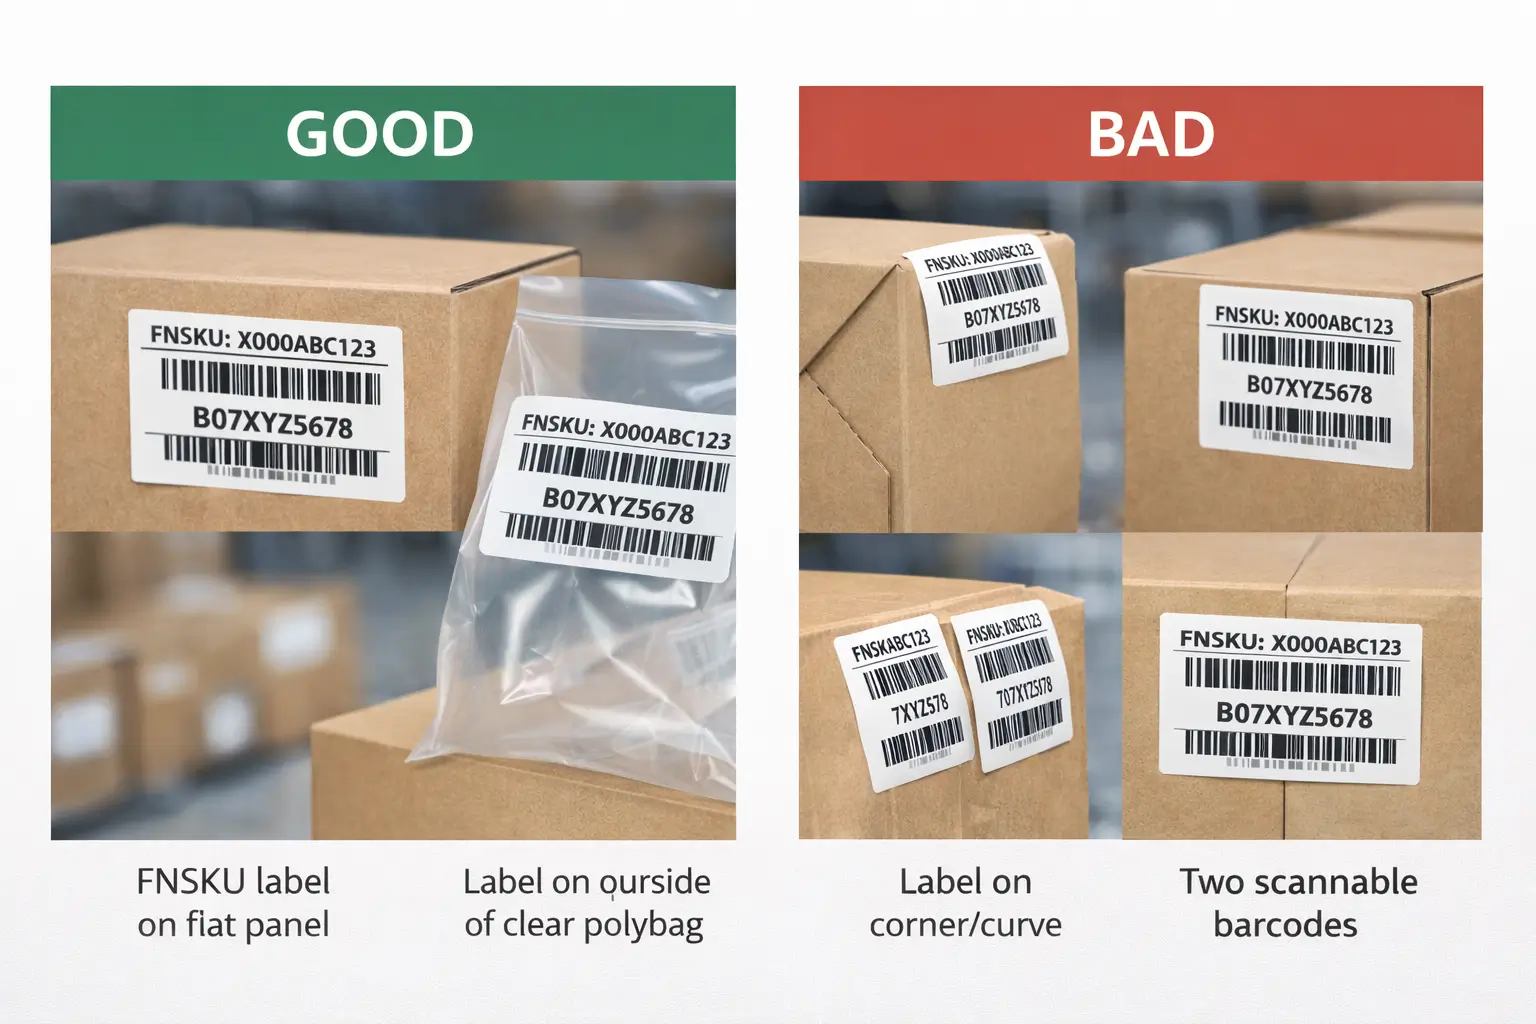
Do/Don’t placement checklist (including prep materials)
Do
- Apply on a flat area of the retail package (or on the outside of the required prep layer).
- Ensure the barcode is unobstructed and not wrinkled.
- Cover other scannable barcodes completely (UPC/EAN).
- If the item needs a polybag/overwrap, keep the barcode on the outside of that prep material.
Don’t
- Don’t place on corners, curves, seams, or edges where the label can distort.
- Don’t leave two barcodes visible on the same unit.
- Don’t “fix” bad alignment by scaling the PDF.
Manufacturer barcode vs Amazon barcode: what changes on March 31, 2026
The headline change is that commingling practices are ending, effective March 31, 2026, which affects when sellers can rely on manufacturer barcodes versus needing Amazon barcodes and labeling—depending on role/eligibility. For operational planning, the key is to treat March 31, 2026 as a workflow checkpoint and confirm the exact rules that apply to your account in Seller Central notices.
Scenario table (high-level decision support)
| Your situation | What changes after Mar 31, 2026 | Practical labeling takeaway |
|---|---|---|
| You were relying on commingling / manufacturer barcode workflows | Commingling ends; eligibility and handling may shift by seller role and listing setup | Plan for more consistent unit-level labeling standards across suppliers (template + 100% print + placement) |
| Your product has no manufacturer barcode | You’ll need Amazon barcode labeling regardless (unit identification still required) | Build a repeatable FNSKU labeling SOP now (don’t wait for the deadline) |
| You’re unsure which barcode path applies to your offers | Rules can be account/workflow dependent | Verify in Seller Central and run a small test shipment before scaling |
Boundary notes
- Keep this section strictly about barcode/labeling decisions (not legal advice or guarantees).
- Always verify the latest Seller Central guidance before changing a live workflow.
Sheet vs thermal: choosing label stock and printers for your workflow
Choose sheet vs thermal based on volume and process control, not on what a vendor says is “best.” Amazon-facing guidance emphasizes legibility and scannability—your print method should consistently produce crisp, high-contrast barcodes with preserved whitespace.
| Option | Best for | Trade-offs |
|---|---|---|
| Sheet labels (Letter/A4) | Lower volume, ad hoc printing, shared office printers | Easy to pick the wrong template; misalignment risks if Letter/A4 is mixed |
| Thermal labels | Higher volume labeling stations, prep centers | Needs standardized roll size + settings + QC to avoid faint or distorted prints |
| Outsourced labeling (factory/prep team) | Multi-supplier operations | Requires one clear standard + proof checks (test print, photos, scan spot-check) |
Pre-ship QC checklist for multi-supplier consolidation (before cartons leave China)
The simplest way to reduce relabeling and receiving surprises is to add a light QC gate before export: confirm the right label file, verify print settings, and spot-check real applied labels on real units. This is best-practice process guidance (not Amazon policy), designed for multi-supplier consolidation where mix-ups are most likely.
Minimum viable QC loop
- Label file/version control: one “approved” label PDF per SKU/variation; avoid multiple versions floating across suppliers.
- Pilot print + alignment check: one page at 100% to confirm fit before mass printing.
- SKU-to-label match check: spot-check 3–5 units per SKU (or per lot) to confirm the label matches the actual product.
- Scan/contrast spot-check: confirm barcodes are crisp, not smudged, and surrounded by whitespace.
- Carton cross-check: ensure cartons aren’t mixed incorrectly (especially similar variants).
- Stop-the-line rule: if any label is scaled, wrinkled, or placed on a seam/corner—fix it before sealing cartons.
If you’re consolidating inventory from multiple suppliers in China, a prep/logistics partner can help you standardize one template, coordinate who labels (factory vs prep), and run QC checks before freight booking—so problems are found upstream instead of after the shipment lands.
FAQ
Q: What is an Amazon FNSKU label?
A: It’s an Amazon barcode label used to identify units for a specific seller’s inventory for a product. Whether you need it depends on whether your units are being received using an Amazon barcode label versus a manufacturer barcode workflow in your Seller Central setup.
Q: What size labels do I need for Amazon FBA (FNSKU)?
A: Start by choosing a Seller Central-supported template that matches your label stock, then print at 100% (no scaling). Amazon guidance commonly references a usable range (around 1″×2″ to 2″×3″) and lists common sheet templates like 30-up 1″×2-5/8″ as a standard default.
Q: How do I print FNSKU labels from Seller Central and choose the right label format?
A: Generate the label PDF from the correct SKU/shipment context, pick the label format that matches your actual stock (Letter/A4/thermal), then test-print one page and print at 100% (no scaling). If alignment is off, change the template—don’t scale the PDF.
Q: Where should I place the FNSKU label, and do I need to cover the UPC/EAN?
A: Place it on a flat, scannable surface and cover any other scannable barcodes (UPC/EAN) completely so the wrong code isn’t scanned at receiving. If you add a polybag/overwrap, keep the barcode on the outside of the prep layer.
Q: Why won’t my FNSKU barcode scan (or why does Amazon reject it)?
A: The most common causes are printing with scaling (“fit to page”), not enough whitespace around the barcode, low contrast/smudging, wrinkled labels, or placing labels on seams/corners. Reprint at 100% from the correct template and re-apply on a flat surface.
Q: Do I need FNSKU labels if my product already has a manufacturer barcode?
A: It depends on your barcode eligibility and workflow settings. Some sellers can use manufacturer barcodes in certain setups, while others must apply Amazon barcode labels—especially as commingling ends and related rules change. Verify your current workflow in Seller Central.
Q: What changes on March 31, 2026 for FBA barcode requirements?
A: Amazon has announced that commingling practices will end effective March 31, 2026 (with “inventory shipped on or after” timing called out), which can shift when manufacturer barcode workflows are allowed versus when Amazon barcode labeling is needed. Confirm the exact implications for your account in Seller Central notices.
Summary: a repeatable labeling standard (plus optional next steps)
A repeatable FNSKU labeling standard is straightforward: choose one template that matches your stock, print at 100% (no scaling), protect scannability (whitespace + contrast), apply on a flat surface, and cover any other barcodes—then add a light QC gate before cartons leave your suppliers. Keep March 31, 2026 on your calendar as a workflow checkpoint, but verify the exact rules that apply to your account before changing live operations.


