

Amazon FBA Warning Labels (US) — What you need to do in 60 seconds
If you’re here for a quick answer: identify which “label” problem you have, then (if you use poly bags) check whether a suffocation warning is triggered by the bag opening size. Once that’s clear, your job is to keep both the warning visible and the barcode scannable.
1) The three label buckets sellers mix up
| Label type | What it’s for | Where it goes |
|---|---|---|
| Warning label (often: suffocation warning) | Safety warning tied to packaging (commonly poly bags) | On the unit packaging (e.g., the bag) |
| FNSKU / barcode label | Identifies the sellable unit Amazon should scan | On the unit (often outside the bag or visible through it) |
| Shipment / carton label | Routes cartons/pallets in inbound shipping | On outer cartons / pallets |
2) The 60-second decision checklist
- Are you poly-bagging the unit? If yes, continue. If not, your “warning label” question may actually be about FNSKU or shipment labels.
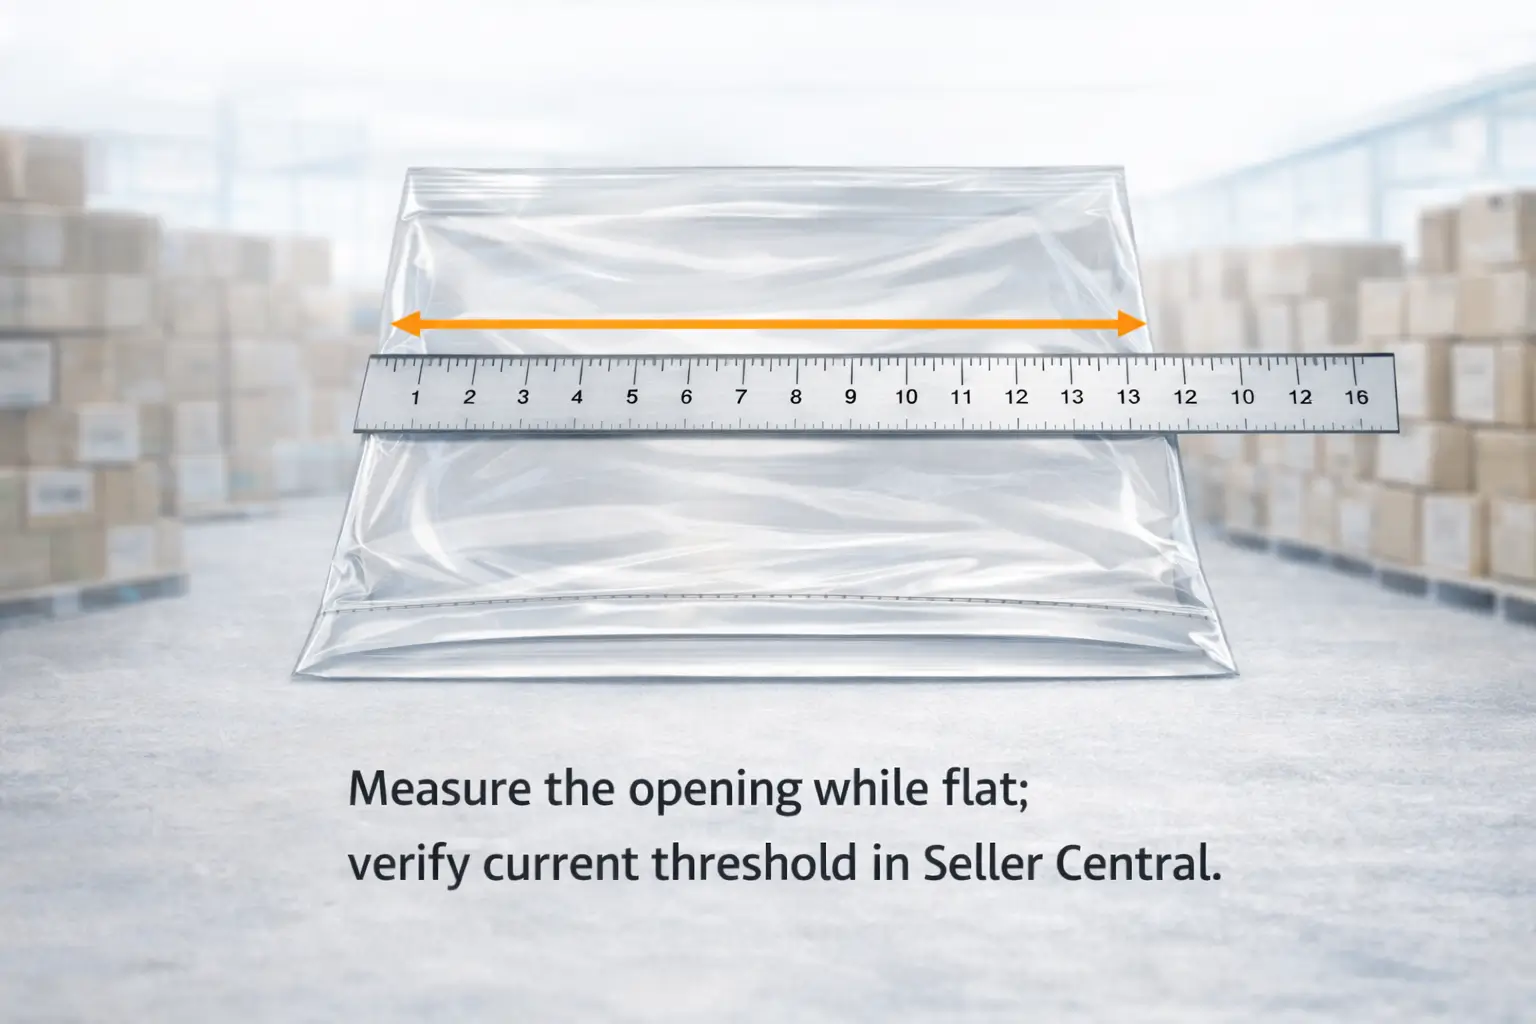
- Check the bag opening rule in Seller Central. Seller guidance commonly references a suffocation warning requirement based on the bag opening size (often cited as 5 inches+ measured when flat). Verify the current wording on the official “bagging requirements” page before you lock your SOP.
- Choose an execution method: a warning can be pre-printed on the bag or applied as a label/sticker (verify the exact expectations in Seller Central).
- Do a fast QC before shipping: warning is visible + bag is properly sealed + barcode is scannable (no glare/wrinkles over the code).
What “warning label” means in FBA (and what it doesn’t)
In FBA terms, a “warning label” usually means a packaging safety warning (most often the poly-bag suffocation warning), not your FNSKU and not your shipment/carton labels. If you treat these as the same thing, you’ll fix the wrong problem—then discover it at receiving.
The practical difference in one sentence
- Warning labels are about packaging safety messaging.
- FNSKU/barcodes are about unit identification.
- Shipment/carton labels are about inbound routing.
Common mix-ups that cause rework later
- You print perfect warning labels… but your FNSKU is covered or unscannable.
- You have the correct FNSKU… but the poly bag needs a warning and doesn’t have it.
- You confirm the unit labels… but forget the carton/shipment labels on the outer boxes.
Do you need a suffocation warning? Poly-bag decision rule + how to measure correctly
For most sellers, the key question is simple: does your poly bag’s opening size trigger a suffocation warning requirement under Amazon’s bagging guidance? Because wording and thresholds can change, treat Seller Central as the final source of truth—but use the measurement steps below to keep your suppliers and prep partners consistent.
A practical measurement SOP (use the same method every time)
- Lay the bag flat on a table (no stretching).
- Identify the opening (the side you would insert the product).
- Measure straight across the opening while the bag is flat (not inflated/opened).
- Compare that measurement to the threshold shown in Seller Central’s bagging requirements guidance.
- If you’re near the threshold, standardize a conservative rule internally (e.g., “treat borderline cases as requiring a warning”) and document it with photos.
What about shrink wrap or vacuum bags?
If your packaging is “bag-like” but not a standard clear poly bag (shrink wrap, vacuum packaging, special retail wrap), don’t guess. Verify how Amazon classifies it for prep in your category guidance, because the right answer can depend on how the unit is handled and scanned at receiving.
If it’s required: printed vs sticker warning, and placement rules that pass receiving
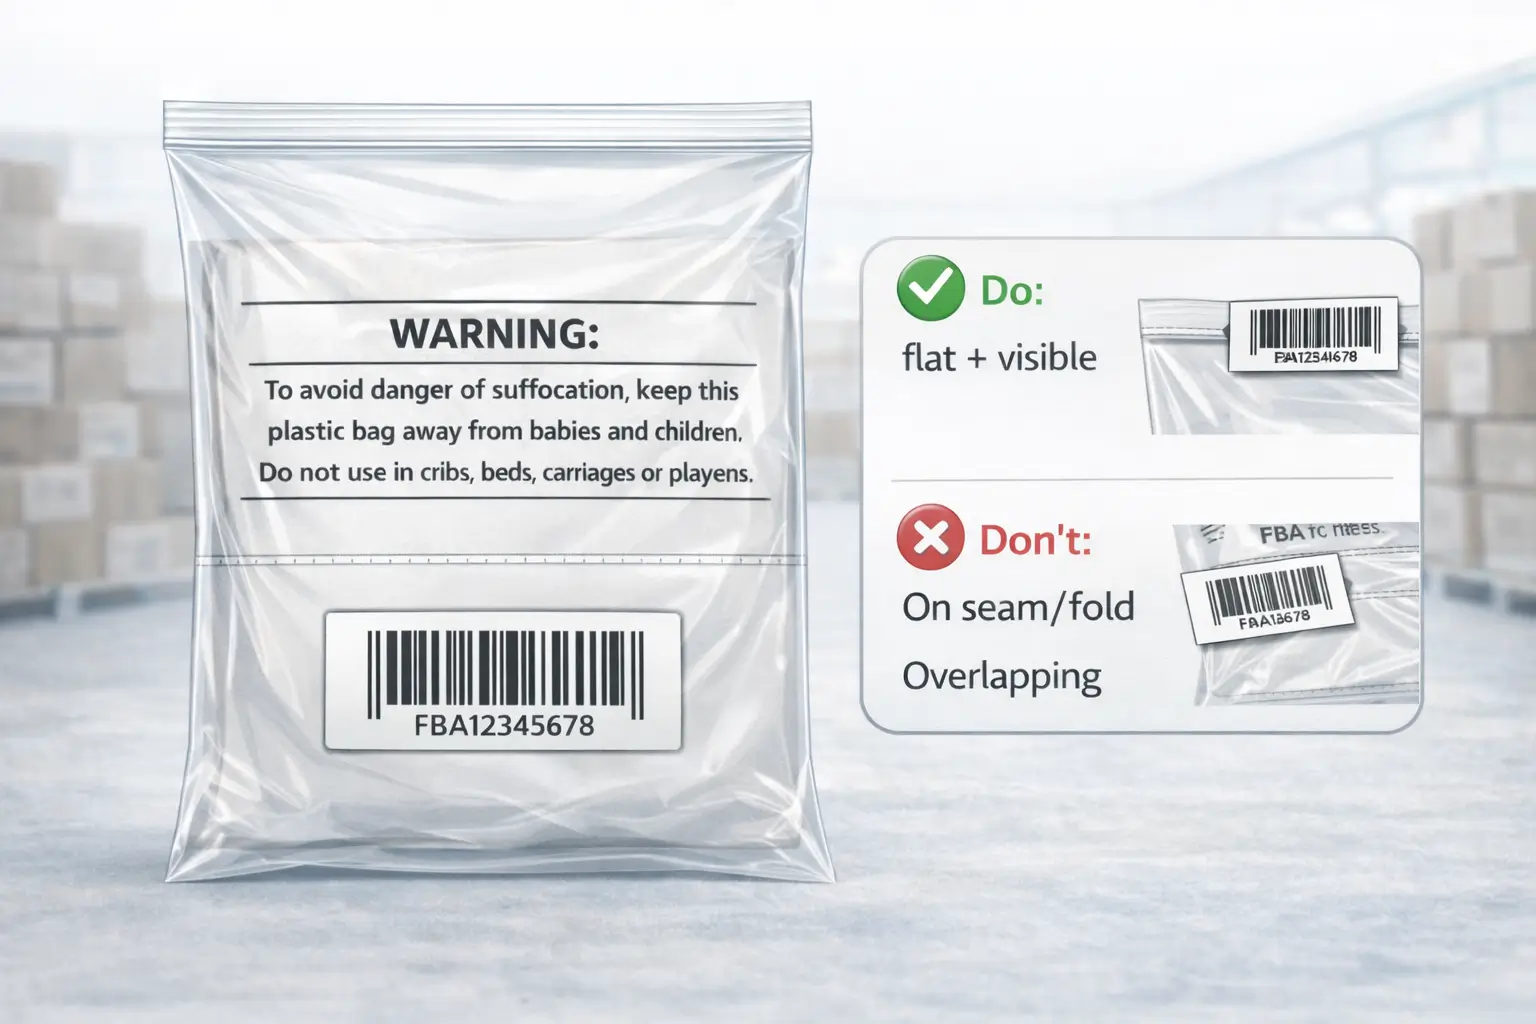
If a suffocation warning is required, your goal is to keep the warning prominent and legible without interfering with scanning or sealing. In practice, sellers usually meet this by using pre-printed warning bags or applying warning labels/stickers during prep—then validating placement in QC.
Printed vs sticker: how to choose
- Pre-printed warning bags are simplest when you have consistent packaging and high volume.
- Sticker/label application is flexible when you have many SKUs, mixed packaging, or frequent changes.
Placement do/don’t checklist (simple but effective)
Do
- Place the warning where it is easy to see on the bag’s surface.
- Keep it flat (no wrinkles) so text stays readable.
- Ensure it’s not likely to rub off or peel during transit and handling.
Don’t
- Don’t place the warning over seams, folds, or areas that get crumpled.
- Don’t cover the only visible warning with another label.
- Don’t “solve” warning placement by creating a barcode scan problem.
Barcode survival guide: keep FNSKU/UPC scannable with bags and warnings
To avoid inbound friction, Amazon needs to scan the correct barcode quickly and reliably—and poly bags can create glare, wrinkles, and “multiple barcode” confusion. The fix is a short scanability SOP that you (or your prep partner) run before cartons are sealed.
Scanability QC checklist (fast and repeatable)
- Correct barcode is visible: the FNSKU/UPC you want scanned is the one that’s easiest to see.
- Barcode is flat: no wrinkles, folds, or curved surfaces over the bars.
- No glare hotspots: lighting can reflect off plastic; test at a couple angles.
- No seam interference: don’t place barcodes across a bag seam or closure edge.
- One-scan mindset: if multiple barcodes might show through the bag, treat it as a mis-scan risk and mitigate (e.g., ensure non-target codes are not visible when appropriate).
A simple “scan test” you can do in prep
Use a standard scanner/app your team trusts and scan a sample from each packaging variant. If scanning is inconsistent, fix placement before you scale the same mistake across the shipment.
What goes wrong most often: mistakes, consequences, and prevention controls
When warning labels or bagging are wrong, your inventory may be delayed, reworked, or require unplanned prep services—and the time cost often hurts more than the material cost. The best prevention is to link each common mistake to a simple control you can apply before the goods leave origin.
Mistake → likely outcome → prevention (quick reference)
| Common mistake | What it may cause | The simplest prevention control |
|---|---|---|
| Missing required warning | Unit may need re-bagging/relabeling or face receiving delays | QC: confirm warning present on sampled units before carton seal |
| Warning present but hard to see | Receiving friction; potential rework | Placement checklist + photo proof per packaging type |
| Bag not properly sealed | Damage risk; receiving/prep issues | Seal check + drop/handling test on samples |
| Barcode wrinkled/glared/covered | Scan failures; delays | “Flat + no glare + no seam” barcode placement SOP |
| Warning and barcode “collide” | Fixing one breaks the other | QC requires both checks to pass before ship |
The mindset that prevents repeat problems
Treat packaging and labeling as a system: warning visibility, sealing, and scanability must all pass at the same time. If you only check one item, the failure shows up at the worst moment—after the shipment is already in motion.
Shipping from China: who applies warnings (supplier vs prep) + QC gate checklist
If you ship from China, the lowest-risk approach is usually: make one party accountable for final packaging compliance, then enforce a QC gate before outbound. Whether that party is the supplier or a prep partner depends on complexity and consolidation.
Supplier vs prep partner: a practical decision guide
| If your situation looks like this… | Usually better ownership is… | Why |
|---|---|---|
| One supplier, stable packaging, few SKUs | Supplier-applied (with clear SOP) | Less handling; faster cycle if supplier is consistent |
| Multiple suppliers, mixed packaging, many SKUs | Prep partner-applied (standardized workflow) | One consistent standard across all inbound units |
| You frequently change packaging or bundle/kitting | Prep partner | Central control reduces “version mismatch” errors |
| You need consolidation + carton planning before FBA | Prep partner | QC + repack + labeling can happen after consolidation |
China-side QC gate checklist (what to verify before booking outbound)
- Warning present (if required): correct packaging type has the warning and it’s visible.
- Placement passes two checks: readable + not in a high-wrinkle zone.
- Seal integrity: bag closure holds under normal handling.
- Barcode scan test: sample scan confirms reliable reads.
- Photo proof pack: 2–3 photos per packaging variant showing warning + barcode visibility.
- Carton-level sanity: carton contents match your shipment plan and your labeling plan (don’t mix label versions).
Need a cleaner China-side workflow for FBA prep? FBABEE can consolidate from multiple suppliers, apply FBA prep (warning labels, FNSKU labeling, kitting), and ship door-to-door to US FBA—so you catch label issues before they become receiving delays.
Special cases + sourcing options: opaque bags, leak risks, buy vs print workflows
After you’ve standardized the core SOP, special cases and scaling choices determine how much variability your team has to manage. Keep these rules verification-driven (category guidance can differ), and focus on operational controls you can reliably execute.
Special-case scenarios (handle with “verify + QC” discipline)
| Scenario | What changes operationally | QC emphasis |
|---|---|---|
| Opaque packaging required for certain products | Visibility and scanning constraints increase | Confirm barcode solution (outside label) + warning visibility if applicable |
| Leakable or spill-prone items | Secondary containment and seal quality matter | Seal check + containment check on samples |
| Sharp/abrasive products | Bag puncture risk | Protective packaging check + drop/handling test |
| Shrink/vacuum packaging | Classification ambiguity | Verify in Seller Central/category guidance; don’t infer from anecdotes |
Sourcing options (choose based on volume and change frequency)
| Option | Pros | Cons | Best for |
|---|---|---|---|
| Pre-printed warning bags | Consistent, fast application | Less flexible if packaging changes | Stable packaging + higher volume |
| Apply warning labels/stickers during prep | Flexible across many SKUs | Needs adhesion/placement QC | Mixed SKUs + frequent changes |
| Print-on-demand during prep | Fast edits when requirements change | Requires printer workflow and QC | Teams with strong process control |
When policy conflicts with what you observed (and how to verify across marketplaces)
When you’ve seen products arrive without a warning, the safest rule is: prioritize current official guidance over anecdotal examples. What “passed once” may not be consistent, and relying on exceptions can turn into preventable inbound problems.
A safe verification workflow (5 minutes, repeatable)
- Check the most relevant Seller Central help pages for bagging/packaging and your category’s prep requirements.
- Confirm whether your packaging type is treated as “bagging” in that guidance (shrink/vacuum edge cases).
- If still unclear, open a Seller Support case or follow documented category guidance rather than guessing.
- Standardize your internal SOP once confirmed (measurement method + placement photos).
Selling in multiple marketplaces?
Requirements and formatting expectations can differ by marketplace. Avoid copying your US SOP into other regions without checking the local Seller Central guidance—use the same “verify first, then standardize” approach per destination.
FAQ: Amazon FBA warning label questions sellers ask most
What is an “Amazon FBA warning label” (and what isn’t it)?
Q: What is an “Amazon FBA warning label” (and what isn’t it)?
A: In most FBA contexts, it means a packaging warning (commonly a poly-bag suffocation warning), not your FNSKU/barcode label and not your shipment/carton labels. If you’re unsure which one you mean, start by identifying whether the issue is packaging safety messaging vs unit identification vs inbound routing.
When do poly bags need a suffocation warning for FBA (US)?
Q: When do poly bags need a suffocation warning for FBA (US)?
A: Seller guidance commonly references a threshold based on the bag opening size measured when the bag is flat (often cited as 5 inches or larger). Because policy wording can change, verify the current requirement in Seller Central’s bagging guidance and then apply the same measurement SOP across all suppliers.
How do you measure the poly bag opening the way Amazon expects?
Q: How do you measure the poly bag opening the way Amazon expects?
A: Lay the bag flat, measure straight across the opening (no stretching), then compare to the threshold shown in Seller Central. If you have multiple suppliers, send a photo of the correct measurement method and require QC photos for new packaging variants.
Can the suffocation warning be printed on the bag, or can I use a sticker/label?
Q: Can the suffocation warning be printed on the bag, or can I use a sticker/label?
A: In practice, sellers usually comply using either pre-printed warning bags or warning labels/stickers applied during prep. Confirm the current expectations in Seller Central, and prioritize visibility + durability (labels that peel off create the same downstream problem as missing warnings).
Where should the warning label go so it’s visible and doesn’t block barcodes?
Q: Where should the warning label go so it’s visible and doesn’t block barcodes?
A: Put it on a flat, easy-to-see area of the bag and avoid seams/folds—then place the barcode so it’s also flat and scannable. The key is to QC both together: a “good warning” that blocks scanning still risks inbound friction.
What happens if the warning label is missing or wrong when inventory arrives at FBA?
Q: What happens if the warning label is missing or wrong when inventory arrives at FBA?
A: It may lead to receiving delays or unplanned prep actions such as re-bagging/relabeling, depending on the issue and how it’s handled at intake. The most controllable prevention is a China-side QC gate (warning presence + placement + seal + barcode scan test) before outbound.
Summary: a one-message checklist you can send your supplier or prep partner
If you want a single handoff message, here’s a copy/paste checklist you can send to your supplier or prep team:
- Confirm whether units are poly-bagged. If yes, verify the current Seller Central bagging guidance for when a suffocation warning is required.
- Use one measurement method: bag flat → measure opening → compare to the current threshold.
- If warning is required: apply pre-printed bag or sticker label and keep it visible, flat, and durable.
- Keep the barcode flat and scannable (no glare/wrinkles/seams; avoid multiple visible barcodes where possible).
- Run QC before outbound: warning present + placement check + seal check + barcode scan test + photo proof pack.
Not affiliated with Amazon; always verify category-specific requirements in Seller Central for your listing before finalizing your SOP.
If you’re coordinating multiple suppliers or you’ve had repeated inbound issues, a China-side consolidation + prep workflow can reduce label surprises. FBABEE supports consolidation, FBA prep (labels, poly-bagging, kitting), and door-to-door shipping to US FBA—so you can standardize QC before goods leave origin.


