

Table of Contents
If you search “Amazon FBA label dimensions,” you’ll get a lot of answers that sound confident—but many are talking about different labels. The fastest way to get this right is to identify which label you’re printing (unit, carton, or carrier) and then match the format to your printer and workflow.
Amazon FBA label dimensions by label type
If you only remember one thing: “FBA label dimensions” depends on the label type—unit labels, carton/box labels, and carrier shipping labels are not interchangeable. Use this quick decision tree to pick the right branch before you print anything.
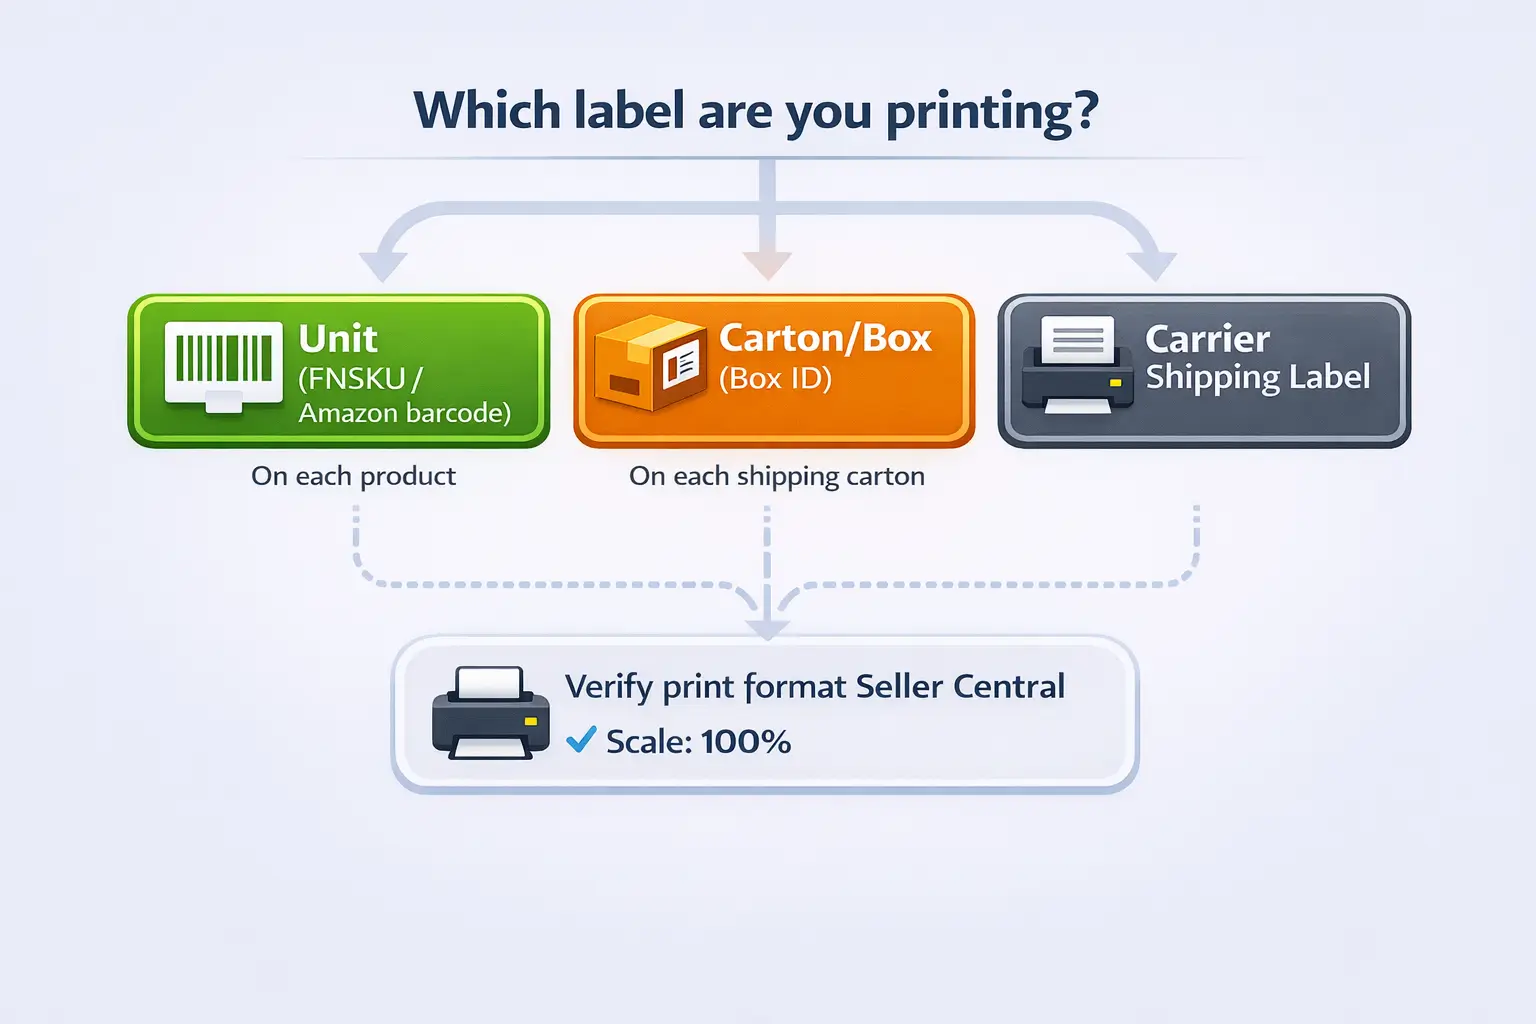
Mini decision tree (start here)
- Labeling individual units (each sellable item)? You’re dealing with product/FNSKU (Amazon barcode) labels or verified manufacturer barcodes.
- Shipping cartons to an FBA fulfillment center? You’ll need carton/box labels (Box ID) on the cartons.
- Handing cartons to a carrier (UPS/FedEx/LTL, etc.)? You’ll also need carrier shipping labels on the cartons.
- Printing from Seller Central? Your print format can often be toggled (sheet vs thermal)—verify the setting for the shipment you’re on.
- Before you hit Print: set PDF scaling to Actual size / 100%—“Fit to page” can quietly shrink or clip barcodes.
Mini table: what “dimensions” usually means
| Label type you mean | Where it goes | What it’s for | Typical label size / format (starting point) |
|---|---|---|---|
| Product/FNSKU (Amazon barcode) | On each unit | Unit identification in FBA | Often a small rectangular label within Amazon’s supported size range |
| Carton/box label (Box ID) | On each shipping carton | Carton identification in receiving | Commonly printed on sheets or thermal, depending on workflow |
| Carrier shipping label | On each shipping carton | Carrier tracking + delivery | Commonly printed as 4×6 thermal or on full-page sheets |
Boundary note: “Typical” does not mean “always.” Your exact print choices depend on workflow and shipment type—confirm what your Seller Central print screen offers before you print a full batch.
What each label is for (product vs carton vs carrier) + comparison table
Now that you’ve chosen the right branch, the simplest way to avoid mistakes is to remember that each label exists for a different scanner at a different moment. Product labels identify units, carton labels identify cartons, and carrier labels move packages through the carrier network.
Comparison table (keep this mental model)
| Label family | Where it’s used | What the barcode is “for” | What sellers most often confuse it with |
|---|---|---|---|
| Product label (FNSKU / Amazon barcode) | On the sellable unit | Inventory identification for FBA fulfillment | Confused with carton/box labels because both are “FBA labels” |
| Carton/box label (Box ID) | On the shipping carton | Amazon receiving can link cartons to a shipment | Confused with carrier labels because both go on the carton |
| Carrier shipping label | On the shipping carton | Carrier tracking + delivery routing | Confused with Box ID labels (two labels, two purposes) |
Product/FNSKU label dimensions: scannability checklist (and small packaging guardrails)
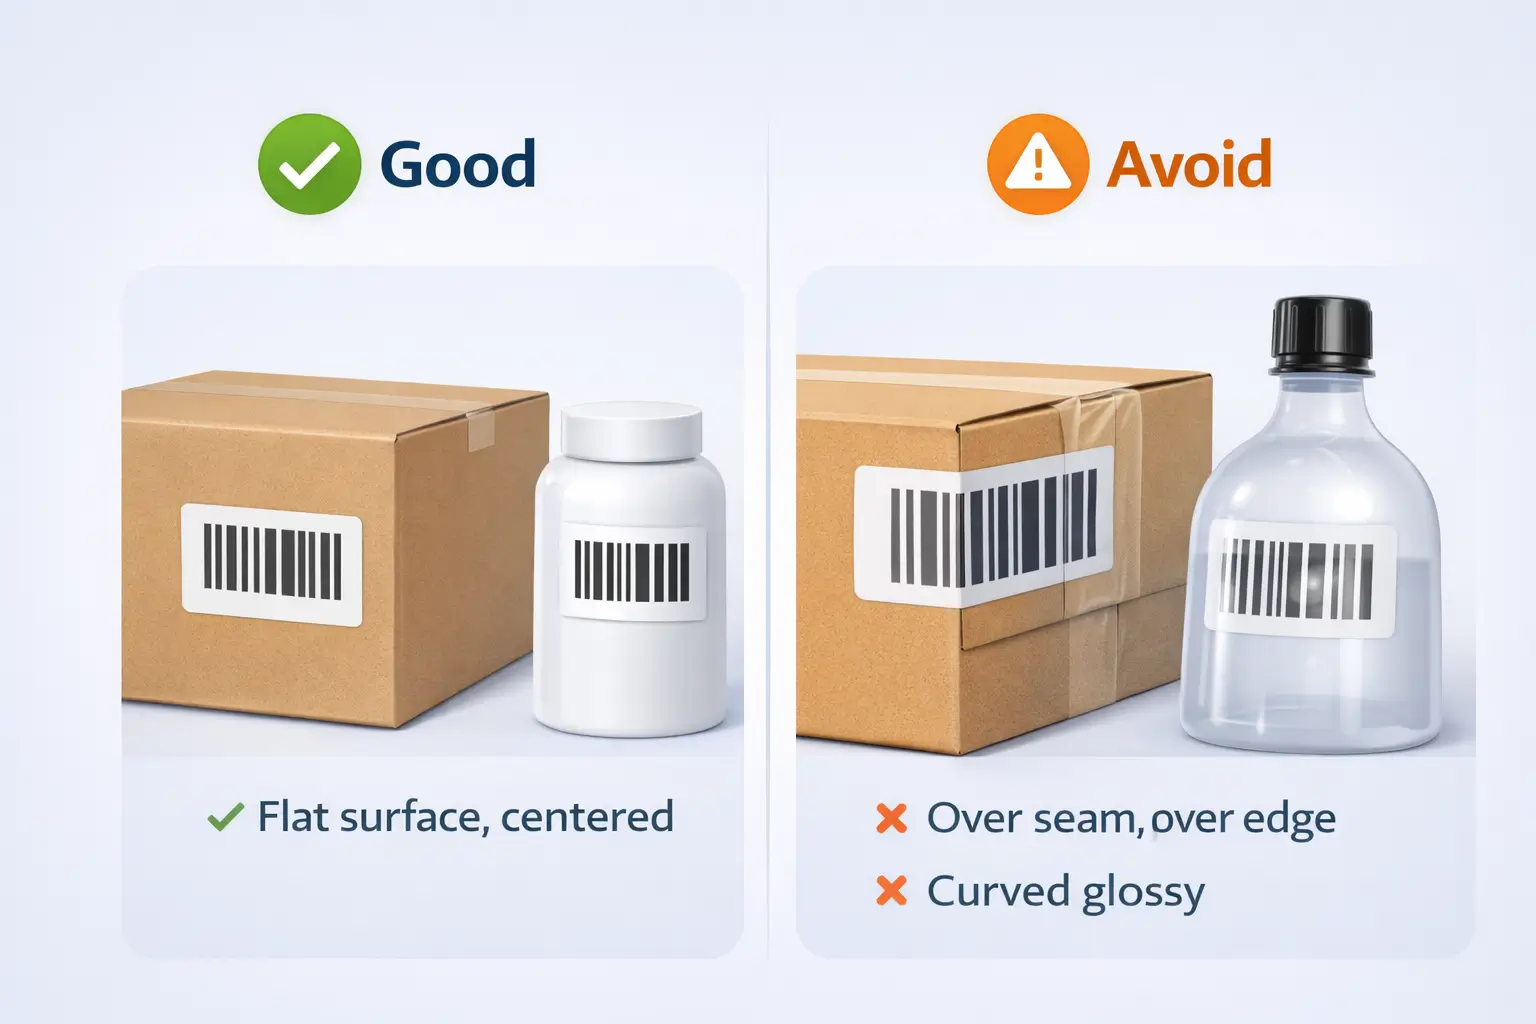
With label types clarified, here’s the practical rule: choose a product/FNSKU label size that stays easy to scan on real packaging, not the smallest label you can force onto the surface. If the barcode is too small, distorted, glossy, or wrinkled, you’ll spend more time fixing labels than saving space.
What “scannable” needs to look like
- High contrast: dark barcode on light background (avoid gray-on-gray).
- Clean edges and whitespace: don’t crowd text or graphics into the barcode area.
- No smears: thermal head dirty, inkjet bleeding, or low toner can ruin scan reliability.
- Flat application: avoid curves, corners, seams, and folds.
- Barcode clarity first: if you have to choose between “pretty packaging” and “clean scan,” choose clean scan.
Sizing guardrails (when you’re tempted to shrink)
- If your packaging is small: redesign placement (a flatter panel) before shrinking.
- If your packaging is curved (bottles, tubes): use a larger label than you think you need, and wrap smoothly—creases break scan lines.
- If your packaging is textured or matte: test adhesion and print clarity; some materials “eat” contrast.
- If you print directly on packaging: test a physical sample under typical warehouse lighting; some finishes glare.
Quick checklist: before you print 500 labels
- Print a single test page/label at 100% / Actual size (no “fit”).
- Apply to the real product packaging (not a flat desk).
- Check for glare, wrinkles, or distortion from curves.
- If the barcode looks tight, clipped, or fuzzy, adjust scaling, margins, or label size before batch printing.
Carton/box labels vs carrier shipping labels: formats and how to print (steps)
Once unit labels are handled, the next rule is straightforward: carton/box labels and carrier shipping labels are both placed on the carton, but they’re not the same label. Treat them as a matched pair—right carton, right Box ID label, right carrier label.
Carton/box label vs carrier label (quick comparison)
| Label on the carton | What it connects | Who scans it first | What goes wrong when it’s mixed up |
|---|---|---|---|
| Carton/box label (Box ID) | Carton ↔ your FBA shipment | Amazon receiving | Carton can’t be matched to the right shipment quickly |
| Carrier shipping label | Carton ↔ carrier tracking | Carrier network | Shipment gets lost/misrouted or can’t be tracked properly |
How to print without mix-ups (workflow steps)
- Finalize your carton plan (how many cartons, what goes in each).
- In Seller Central shipment workflow, print carton/box labels (Box ID labels).
- Print carrier shipping labels for the same cartons (either within the workflow or via carrier tools, depending on your flow).
- Apply both labels on a flat side of the carton where they won’t fold over edges.
- Do a fast QA pass: confirm each carton has the correct pair (its own Box ID + its own carrier label).
Boundary note: Some shipment types (for example palletized freight) may introduce additional labeling steps (such as pallet labels). If you see extra label prompts, follow the workflow for that shipment type rather than forcing a “one size fits all” approach.
Label placement rules: cover UPC/EAN and avoid barcode conflicts
After you print the right labels, the next biggest success factor is placement: put the barcode on a flat, scannable surface and avoid multiple competing barcodes being visible. Most “label problems” aren’t really label-size problems—they’re placement and barcode-conflict problems.
Unit placement: do / don’t
Do
- Place the label on a flat panel of the product or its outer packaging.
- Keep it away from seams, folds, corners, and curves.
- Ensure the barcode isn’t covered by tape wrinkles or glossy reflections.
Don’t
- Don’t place a barcode over an edge where it will bend.
- Don’t place on high-gloss curves where glare breaks scanning.
- Don’t let labels overhang or partially detach.
UPC/EAN conflicts: what to do (without guessing policy)
- If you apply an Amazon barcode label (FNSKU), your goal is to prevent scanners from reading the “wrong” barcode.
- If the manufacturer barcode (UPC/EAN) is visible in more than one place, treat that as a risk flag—it may require you to address each visible barcode area to reduce mis-scan risk.
Carton placement: do / don’t
Do
- Place carton/box labels and carrier labels on a flat side, not across a seam.
- Keep labels clean and unwrinkled; carton creases break scan lines.
- Make sure both labels are fully visible (no stretch wrap hiding them).
Don’t
- Don’t place labels where they’ll be torn by handling (edges/corners).
- Don’t cover barcodes with glossy tape unless you’ve tested glare under warehouse lighting.
Printers and print settings: thermal vs sheets + “fit to page” pitfalls
Once placement is correct, printing becomes the reliability lever: choose a printer workflow that produces consistent, high-contrast barcodes, and always control PDF scaling. A perfect label design can fail if the printer silently rescales it.
<
Thermal vs sheets (decision table)
| Option | Best for | Pros | Common gotchas |
|---|---|---|---|
| Thermal (4×6) | Frequent shipping + high label volume | Fast, consistent, no ink/toner smears | Wrong paper size selection can clip parts of the label |
| Laser/inkjet sheets | Low volume or office setup | Easy to start, uses common paper | Margins and “fit to page” can shrink/distort barcodes |
Print settings checklist (use this every time)
- In your PDF print dialog, select Actual size / 100% (avoid “Fit,” “Shrink,” or “Scale to printable area”).
- Confirm the paper/label size matches your choice (sheet vs thermal).
- Print one test label and check:
- barcode is not clipped
- lines look crisp (not fuzzy or broken)
- text remains readable
- Only then print the full batch.
Boundary note: Seller Central print defaults and label format selectors can change or reset. Treat each new shipment as “verify format before batch printing,” especially when switching between sheet and thermal outputs.
Common labeling mistakes + pre-ship QA checklist (stop-ship checks)
With sizes, placement, and printing settings set, your best protection is a short QA loop: catch the high-frequency mistakes before cartons leave your factory or prep workflow. This reduces rework risk—but it can’t guarantee outcomes because handling and transit vary.
Top mistakes that trigger relabeling or delays
- Printing the wrong label type (unit label on carton, or mixing Box ID and carrier labels).
- Printing with “fit to page” and shrinking the barcode.
- Low-contrast print (gray bars, smears, low toner, dirty thermal head).
- Wrinkled labels (applied over seams/curves).
- Labels peeling due to poor adhesion or dusty cartons.
- Multiple visible barcodes creating barcode conflicts.
“Stop-ship” QA checklist (10 minutes that saves hours)
- First-carton check: verify the label pair (Box ID + carrier label) matches the carton.
- Unit spot-check: pick a few units per SKU and confirm labels are flat, clean, and readable.
- Scan-sanity check: if you have a scanner/app, confirm the barcode reads instantly (no repeated attempts).
- Photo proof: capture a clear photo of (a) unit label placement and (b) carton labels on the carton side.
- Plan-change trigger: if carton contents or carton count changes late, treat that as “re-check and reprint.”
Shipping from multiple factories? FBABEE can help you standardize labeling (format, placement rules, QA photos) during China-side consolidation and prep—so cartons leave once, correctly. Not affiliated with Amazon.
Case packs vs mixed-SKU cartons: what changes for labeling
After the baseline workflow, here’s the scenario truth: mixed-SKU cartons increase labeling risk because carton plans change more often. Case packs are simpler; mixed cartons require tighter control so labels always match real contents.
Scenario table: what to watch
| Scenario | What’s easier | What’s riskier | Best practice move |
|---|---|---|---|
| Case pack (same SKU per carton) | Stable packing pattern | Less common relabeling | Lock carton count early; keep unit labels consistent |
| Mixed-SKU carton | Flexible packing | Higher chance of plan changes and label mismatch | Finalize carton plan before printing Box ID labels; reprint if cartons change |
Boundary note: Some shipment workflows require box content details depending on shipment type and settings. Follow what your shipment creation screens request rather than assuming the same rule applies to every shipment.
UPC/EAN vs FNSKU: when you can skip Amazon barcode labels (decision checklist)
Now the decision that changes everything: whether your units can rely on manufacturer barcodes (UPC/EAN) or need Amazon barcodes (FNSKU). Treat this as a verification-first decision—eligibility depends on product and workflow configuration.
Verification-first checklist (before you skip labels)
- Confirm your listing/workflow is configured to use manufacturer barcodes (not Amazon barcodes).
- Confirm your products are eligible under current barcode requirements (and watch for upcoming changes).
- Confirm all units have consistent, scannable manufacturer barcodes on the outermost sellable packaging.
- If you switch to Amazon barcodes (FNSKU), plan for barcode conflict control (cover other visible barcodes as needed).
Time-sensitive note: Amazon has announced barcode requirement changes effective March 31, 2026. Verify the current requirement summary inside Seller Central before you make packaging decisions that lock you into one barcode route.
Outsourcing labeling to a prep center: the instruction pack you should send
Once you outsource, the core rule becomes: your results depend on how specific your instructions are. A prep team can’t “guess” which label type or format you meant—so give them a standard instruction pack.
The minimum instruction pack (copy/paste checklist)
- Per-SKU label type: unit/FNSKU label needed or manufacturer barcode route verified.
- Label format expectation: thermal vs sheets (and which output you want for shipment labels).
- Placement rules: where to place on the unit; what surfaces to avoid (seams/curves/gloss).
- Barcode conflict rule: what to do if UPC/EAN is visible on the packaging.
- Print settings rule: “Actual size / 100%” and no “fit to page.”
- QA photos required: unit label placement + carton side showing both carton label and carrier label.
- Exception handling: what to do if a label doesn’t fit (pause and ask, don’t shrink blindly).
Boundary note: Different prep centers use different printers by default. Confirm whether they print 4×6 thermal or sheets before peak season.
FAQ
What size are Amazon FBA labels?
Q: What size are Amazon FBA labels?
A: “FBA labels” is an umbrella term—product/FNSKU labels, carton/box labels, and carrier shipping labels can all be involved, and the right size depends on which one you mean. Start by identifying whether you’re labeling units, cartons, or carrier packages, then choose the print format your Seller Central workflow supports.
Which Amazon FBA label dimensions apply to my case (product vs carton vs shipping)?
Q: Which Amazon FBA label dimensions apply to my case (product vs carton vs shipping)?
A: Use this shortcut: units → product/FNSKU label, cartons → carton/box label, carrier handoff → carrier shipping label. If you’re printing from Seller Central, confirm the print format selector (sheet vs thermal) before you batch print.
Can I use 4×6 labels for Amazon FBA shipping/box labels?
Q: Can I use 4×6 labels for Amazon FBA shipping/box labels?
A: Often, yes—many sellers use 4×6 thermal printing for shipment-related labels, but the exact options can depend on shipment type and workflow. Check the label format option shown on your Seller Central print screen for that shipment, then do a one-label test at 100% scale.
How small can I make an FNSKU barcode and still have it scan reliably?
Q: How small can I make an FNSKU barcode and still have it scan reliably?
A: Smaller barcodes raise scan-failure risk, especially on curved, glossy, or textured packaging. If space is tight, try a flatter placement area or packaging redesign before shrinking; print a test label at 100% scale and verify it scans instantly under typical lighting.
Where should I place an FNSKU label, and do I need to cover the UPC?
Q: Where should I place an FNSKU label, and do I need to cover the UPC?
A: Place it on a flat, non-glare surface away from seams and edges. If other barcodes (like UPC/EAN) remain visible, treat that as a barcode-conflict risk—your goal is to prevent scanners from reading the wrong code, so you may need to address each visible barcode area depending on your setup.
What labeling mistakes most often cause relabeling or receiving delays?
Q: What labeling mistakes most often cause relabeling or receiving delays?
A: The repeat offenders are: wrong label type, print scaling (“fit to page”), low-contrast/smeared print, wrinkled labels on seams/curves, peeling labels, and multiple visible barcodes. A short “stop-ship” QA pass (test print, placement check, photo proof) catches most of these early.
When can I use manufacturer barcodes (UPC/EAN) instead of an Amazon FNSKU label?
Q: When can I use manufacturer barcodes (UPC/EAN) instead of an Amazon FNSKU label?
A: Only when your product and workflow configuration support it—treat it as verification-first. Confirm eligibility and current barcode requirements in Seller Central before you skip unit labels, especially if you’re making packaging decisions that are hard to reverse.
Summary: 5-minute labeling checklist + what to verify next
If you’re about to print labels right now, here’s the fastest safe sequence: identify label type → choose print format → print at 100% → place on flat surfaces → QA before ship.
5-minute checklist
- Identify the label you’re printing: unit, carton, or carrier.
- Confirm print format on the workflow screen: sheet vs thermal.
- Print one test at Actual size / 100% (no “fit”).
- Apply and check for glare, wrinkles, clipped barcodes, and barcode conflicts.
- Photograph a sample: unit label placement + carton side labels.
- If carton plans change late: re-check and reprint.
If labeling keeps causing rework (especially with multiple suppliers), a shared SOP + QC photo checklist can stabilize the whole inbound flow. That’s the kind of prep coordination FBABEE supports during consolidation—without making “guarantee” claims.
Marketplace differences: what to double-check
This article is US-focused, but the safest cross-market habit is the same: trust what your print screen shows for that marketplace and shipment type. Before batch printing, double-check (a) supported print formats, (b) any “box content” prompts, and (c) the current barcode requirement summary in that marketplace’s Seller Central.


