

Table of contents
Amazon FBA barcode requirements in 2026 (FNSKU vs UPC/EAN) + the 2026-03-31 routing checkpoint
If you’re unsure what to label, start with this rule: use the barcode path your listing is set to use, then make sure the sellable unit has a scannable code on the outside. A big shift is scheduled for March 31, 2026, so you should verify your eligibility and settings before you print packaging or labels.
Fast routing box (use this before you print anything):
| Your situation (typical) | Safer default path | What to do next (2 minutes) |
|---|---|---|
| You’re a private-label brand owner and can keep using manufacturer barcodes (eligible) | Manufacturer barcode (UPC/EAN/GTIN) | Confirm eligibility + barcode setting in Seller Central; make sure the unit barcode is scannable on the outermost layer. |
| You’re a reseller, or you’re not eligible to use manufacturer barcodes without stickers | Amazon barcode (FNSKU) | Switch/confirm you’re using Amazon barcodes; generate FNSKU labels; apply labels and cover conflicting barcodes. |
| You have multiple factories/SKUs and you’ve had mix-ups before | Amazon barcode (FNSKU) for tighter attribution | Centralize label files and SKU→label mapping; add a scan test + photo proof gate before export. |
| You rely on Amazon to prep/label units | Plan for self/prep-partner labeling | Verify current service availability in your Seller Central account and build an external labeling workflow. |
Non-negotiables (no matter which path you use):
- Each sellable unit needs an exterior scannable barcode/label that matches how Amazon expects to track that unit.
- If you add packaging (polybag/overwrap), the barcode must remain scannable without opening the unit.
- Don’t assume a blog post is “the policy”—Amazon requirements and eligibility can change, especially around 2026 dates.
FNSKU vs manufacturer barcode (UPC/EAN/GTIN): how to choose (and what you give up)
Once you’ve seen the fast rule, the real decision is whether you want Amazon-level attribution control (FNSKU) or the simplicity of keeping manufacturer barcodes. In practice, the “best” choice depends on eligibility (which can change), how your packaging is produced (factory-printed vs labeled later), and how much mix-up risk you can tolerate.
Quick definitions (so the table makes sense)
- FNSKU (Amazon barcode): A barcode that identifies inventory as yours and ties units to your specific listing/shipment workflow.
- Manufacturer barcode: The UPC/EAN printed on retail packaging (often part of a GTIN system). GTIN is a global identifier family used to uniquely identify trade items.
Comparison table: Amazon barcode (FNSKU) vs manufacturer barcode
| Dimension | Amazon barcode (FNSKU) | Manufacturer barcode (UPC/EAN/GTIN) |
|---|---|---|
| When it’s a good fit | You need stronger attribution control, you’re not eligible for stickerless manufacturer barcodes, or you want a consistent SOP across many suppliers/SKUs. | You’re eligible to use manufacturer barcodes without stickers and your packaging already has clean, scannable UPC/EAN printed at the factory. |
| What you “give up” | More labeling work (you must generate/apply labels correctly). | Less flexibility if eligibility changes; switching later can require relabeling or packaging changes. |
| Best for | Multi-SKU brands, sellers consolidating from multiple factories, products where a mis-scan would be costly. | Simple catalog, stable packaging, strong confidence the printed barcode stays scannable on the sellable unit. |
| Common failure mode | Wrong FNSKU applied to the wrong variant; multiple visible barcodes causing mis-scan. | Printed barcode is obscured by overwrap/polybag or becomes unscannable; eligibility/settings shift and you have to rework. |
| Your “verify first” step | Confirm your listing is set to use Amazon barcodes; download labels; lock SKU→label mapping. | Confirm you’re eligible and your settings allow manufacturer barcodes; validate placement on the outermost layer. |
If you’re deciding before mass production, the safest approach is to verify settings and eligibility first, then choose the path that keeps rework low if rules shift (for many sellers, that means standardizing on FNSKU even if manufacturer barcodes are possible).
What changes on March 31, 2026: stickerless/commingled ends and eligibility shifts (what to do next)
Because the March 31, 2026 update can override your “default” barcode plan, treat it like a routing checkpoint: verify whether you can keep using manufacturer barcodes without stickers, or whether you need to move to FNSKU labeling. Amazon has announced it will end commingling practices and update eligibility criteria effective March 31, 2026.
What “commingling/stickerless” means in plain English
Stickerless/commingled inventory has historically allowed units tracked by a manufacturer barcode (like a UPC/EAN) to be fulfilled interchangeably when the product is considered identical. If commingling ends and eligibility tightens, more sellers will need an Amazon barcode workflow (FNSKU) to keep inventory attribution and receiving consistent.
What to do now (a simple transition plan)
- Step 1: Identify your current barcode path per SKU. Don’t rely on memory—check the listing setting you’re actually using.
- Step 2: If you can keep manufacturer barcodes, confirm your packaging is “ready for receiving.” That means the barcode is scannable on the outermost layer and not competing with other visible barcodes.
- Step 3: If you need to switch to FNSKU, standardize early. Generate labels, apply them consistently, and update your supplier/prep SOP so every unit arrives with the correct, scannable label.
- Step 4: If you have inventory already in the pipeline, prioritize high-risk SKUs. Start with products that have many variants, multiple suppliers, or packaging that gets rewrapped.
How to get FNSKU labels: download, keep the SKU mapping clean, and avoid variant mix-ups
If you decide (or are required) to use Amazon barcodes, the goal is simple: get the right label for each SKU and prevent mix-ups across variants. Most inbound barcode problems aren’t “printing problems”—they’re mapping problems (the wrong label on the right product).
Step list: verify requirement → download labels → lock SKU-to-label mapping
Use this workflow as your “label packet” SOP: verify first, then generate labels, then lock the mapping before anyone prints or applies stickers.
- Verify the barcode path you’re using for the SKU. Before you print labels or packaging, confirm whether the SKU is set to use an Amazon barcode or a manufacturer barcode.
- Download the correct FNSKU labels for that SKU. Use Seller Central’s label generation flow to export the labels you’ll apply to units.
- Create a simple SKU→label mapping file. A spreadsheet with: seller SKU, product name/variant, and the exact label file name you sent to the factory/prep team.
- Version-control your label set. If you change packaging, bundle composition, or listing structure, treat it like a new version and re-issue the label packet.
- Distribute labels the same way every time. One “source of truth” folder, one mapping file, and one owner responsible for approving changes.
A practical rule for multi-supplier shipments: don’t let each factory “manage labels their own way.” Centralize labels and mapping, then ask for photo proof and a scan test on random samples before cartons are sealed.
Printing and scan-test basics: what makes an FNSKU label scannable
Once your mapping is clean, scannability becomes the next bottleneck: labels must be readable, durable, and not distorted by packaging. You don’t need to memorize specs—focus on the failure modes that cause receiving delays.
Scannability basics that prevent most problems:
- No scaling surprises: Print at 100% size (avoid “fit to page” that shrinks or stretches barcodes).
- High contrast + clean edges: Smudged ink and low contrast are a common reason a barcode won’t scan.
- Keep the barcode flat: Barcodes wrapped around corners, seams, or curves can become unscannable.
- Do a quick scan test before you ship: Use a barcode scanner app or handheld scanner on random units to catch print/placement issues early.
If you’re choosing between “factory labels” vs “prep center labels,” the scan test matters more than the printer type: the winning workflow is the one that catches problems before export.
Label placement and covering other barcodes (UPC/EAN): the fastest way to prevent mis-scans
After printing, the most common inbound failures come from placement and barcode conflicts—so the direct answer is: put the scannable barcode on a flat, visible surface of the sellable unit’s outermost layer, and avoid multiple competing barcodes. This is especially important when you polybag, overwrap, or add prep materials.

Do/don’t list: where to place an FNSKU label so it scans reliably
Do
- Place the label on a flat surface with minimal glare.
- Keep the label on the outermost layer after prep (polybag/overwrap).
- Smooth out bubbles and wrinkles so the barcode lines stay straight.
- Keep labels away from edges that get crushed during handling.
Don’t
- Don’t wrap the barcode over a corner, seam, or curve.
- Don’t place the label where it will be covered by tape, straps, or “prep stickers.”
- Don’t hide the barcode inside the polybag or inside a box that must be opened to scan.
Covering UPCs and multiple visible barcodes: what to do and why it matters
If your unit shows a UPC/EAN and you apply an FNSKU label, the goal is to reduce mis-scans: receiving scanners should find one clear, intended code first. In practice, this usually means covering or obscuring other visible product barcodes when you’re using an Amazon barcode workflow—especially if multiple barcodes are visible in the same scan area.
For polybags in particular, treat this as a hard rule: the barcode must be scannable without opening or unwrapping the unit.
Special packaging cases: bundles, multipacks, sets, and polybags
When packaging changes what the customer receives, the direct answer is: label the sellable unit exactly as it will be sold, and make sure the barcode is scannable on the outside of that final unit. Most mistakes happen when sellers label a component instead of the final pack (or vice versa).
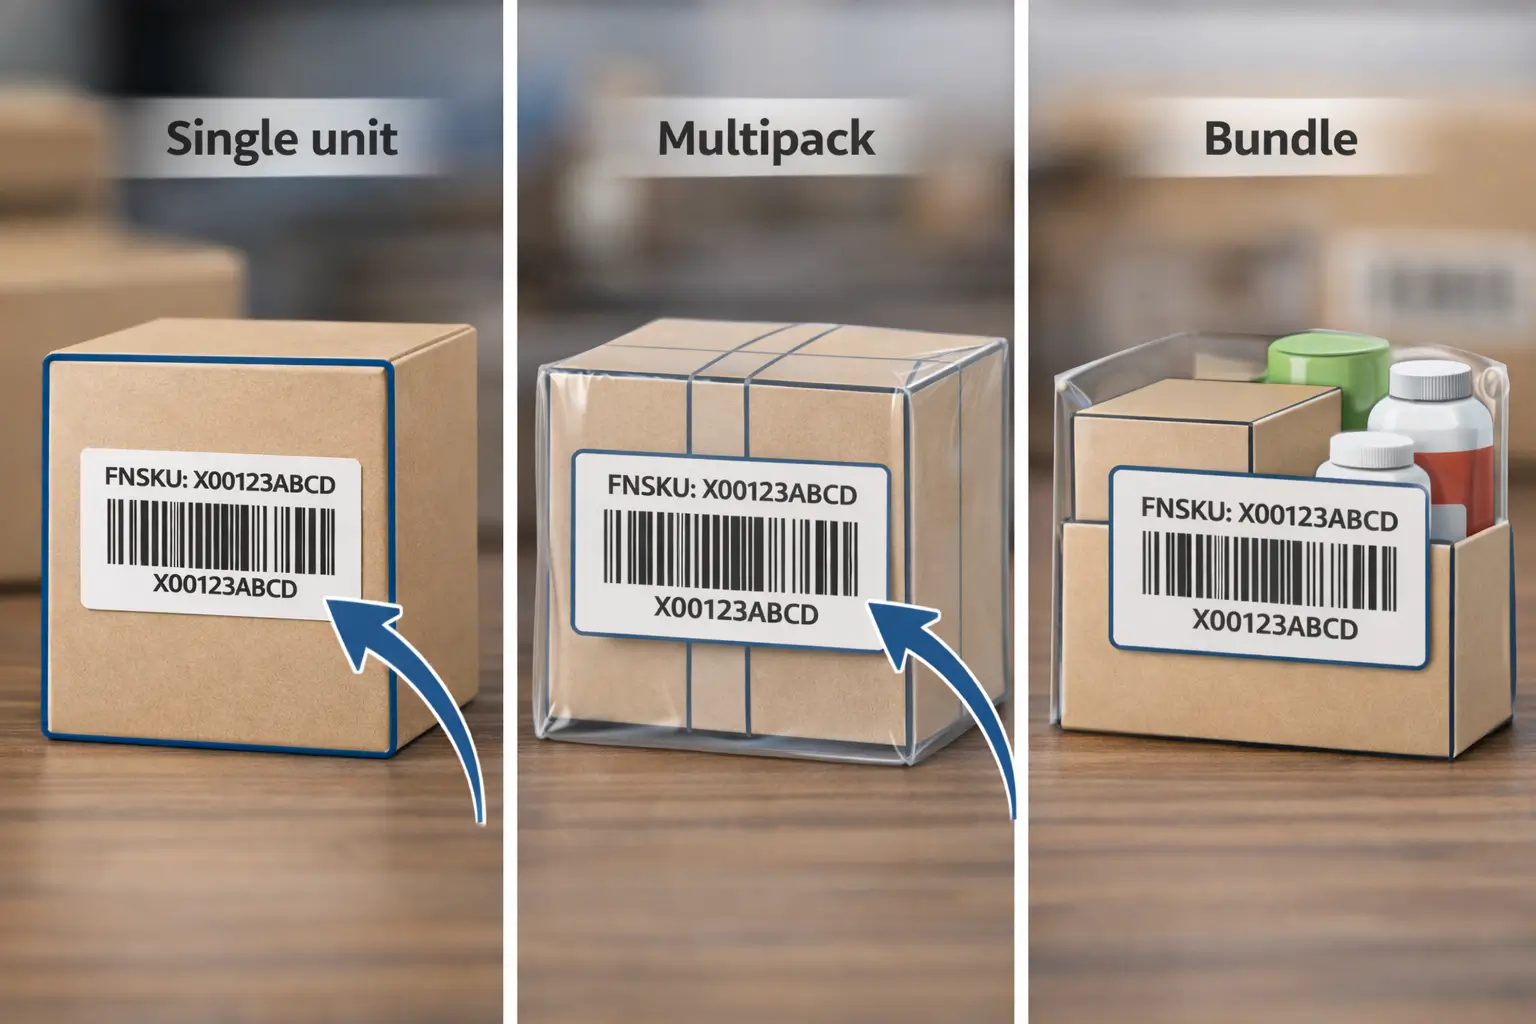
Scenario guidance (keep it simple):
- Multipack (e.g., 2-pack): If you sell it as a 2-pack, the outer 2-pack is the sellable unit—barcode goes on the outer pack.
- Bundle (multiple different items sold together): The bundle is the sellable unit; label the outside of the bundle packaging and avoid leaving component barcodes visible if they could be scanned instead.
- Set / kit: Treat the finished set packaging as the sellable unit and label the outside.
- Polybagged items: Place the barcode on the outside of the bag (or on the product where it remains fully scannable through the bag), and avoid wrinkles over the barcode area.
If you’re unsure whether your packaging structure changes how Amazon expects the item to be labeled, verify the relevant policy page in Seller Central before you ship.
Who should label: factory vs China prep center vs Amazon label service (choose the lowest-risk workflow)
Once you know what barcode you need, the next decision is operational: the lowest-risk workflow is the one that gives you consistent mapping control and a verification gate before export. For multi-supplier shipments, factory labeling can be fast—but it’s also where most wrong-variant label mix-ups happen.
Before you decide, note that Amazon has stated it will no longer offer prep and item labeling services for FBA shipments in the US store starting January 1, 2026, so you should verify what services are available in your account and plan an external workflow if needed.
Decision table: compare factory labeling, prep-center labeling, and Amazon labeling service
| Option | Pros | Cons | Best for | QC gate you should add |
|---|---|---|---|---|
| Factory labels units | Fast, close to production; can label before cartons are sealed | Highest mix-up risk when SKUs/variants are similar; harder to rework once packed | Simple product line, stable packaging, factories with strong QC | Require SKU→label mapping file + photo proof + random scan test before cartons are sealed |
| China prep center labels units | Centralized control; easier to consolidate multi-supplier shipments; can fix issues before export | Adds one more handoff; needs clear SOP and scheduling | Multi-supplier shipments; many SKUs; brands that want repeatability | Single “label packet” owner + sampling scan test + exception log before shipping |
| Amazon labeling service | Minimal work for seller when available | Availability/eligibility may change; less control; errors are harder to fix mid-stream | Low-volume sellers or simple SKUs (and only if the option is available) | Verify eligibility at shipment creation; keep a backup plan (prep partner or self-labeling) |
Supplier brief checklist: what to send (labels + mapping) and what to photo-check
If you outsource labeling to a factory or prep partner, send one clear “label packet” every time:
- SKU list with variant descriptors (size/color/model) and photos.
- The label PDF files, named to match the SKU list (no ambiguous filenames).
- A one-page “label placement rule” (outermost layer, flat surface; avoid corners/curves).
- A request for proof: photos of labeled units + carton-level photos, and a short scan test on random samples.
This doesn’t guarantee perfect receiving—but it dramatically reduces the most common wrong-label and mis-scan failures.
Common barcode/labeling mistakes that cause receiving delays (and how to prevent them)
If you want the fastest quality upgrade, focus on these patterns: most receiving delays come from a small set of repeatable mistakes, and each one has a simple prevention gate. Treat this section as a pre-export checklist, not a post-mortem.
Risk checklist: mistakes → symptoms → prevention gates (pre-export QC)
| Common mistake | What it looks like at receiving | Prevention gate before export |
|---|---|---|
| Wrong FNSKU on the wrong variant | Inventory checks in under the wrong SKU, or becomes “problem” inventory | Lock SKU→label mapping; require photo proof showing the label next to the variant identifier |
| Multiple visible product barcodes | “Barcode cannot be scanned” or wrong barcode scanned | Cover/obscure competing barcodes when using FNSKU; scan-test the final packaged unit |
| Barcode placed on a curve/seam/corner | Scanner fails or misreads | Placement SOP: flat face only; re-check placement during sampling |
| Barcode hidden by overwrap or polybag wrinkles | Barcode won’t scan without handling/unwrapping | Place barcode on the outermost layer; avoid wrinkles over the barcode area |
| Print scaling / low contrast / smudging | Intermittent scan failures | Print at 100% scale; quick scan test on random units; reject smudged batches |
| Labels applied after cartons are packed | Mixed labeling quality and missed units | Add a “no carton sealing before label QA” gate |
| Mixed-SKU cartons without clear controls | Factory/prep grabs the wrong label roll/file | Use batch separation and a single owner for label files |
| “Fixes” with tape that creates glare | Scans fail due to reflection or distortion | Use appropriate label materials; test under warehouse lighting when possible |
When you implement these gates, you’re not chasing perfection—you’re buying down the biggest sources of inbound exceptions.
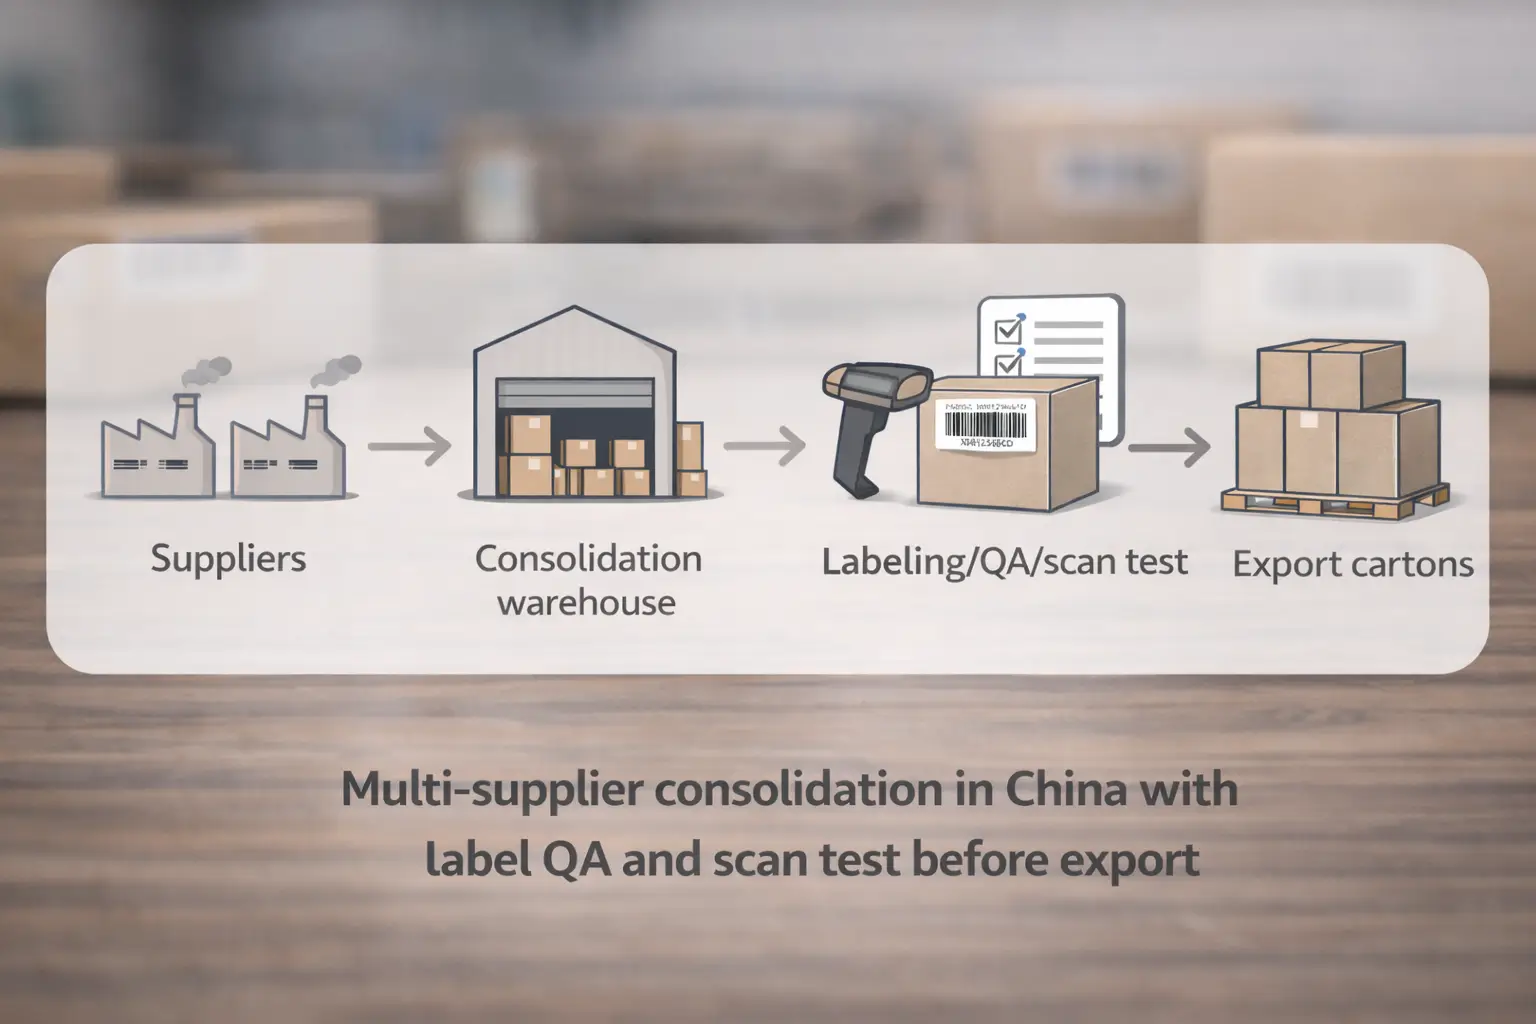
China-side pre-shipment checklist: QC + labeling handoff for multi-supplier FBA shipments
If you ship from China, the direct answer is: run labeling as part of your consolidation SOP, not as a last-minute “sticker task.” The goal is to catch SKU/label/placement issues while inventory is still easy to rework—before it’s on the water.
Minimum viable pre-shipment checks (copy/paste into your SOP):
- Confirm each SKU’s barcode path (Amazon barcode vs manufacturer barcode) before labeling starts.
- Keep one master SKU→label mapping file (single owner; versioned).
- Verify packaging changes (polybag, bundle wrap, inserts) won’t hide or distort the barcode.
- Sample-check label placement on each SKU (flat face; no corners/seams).
- Run a quick scan test on random units per SKU after final packaging.
- Check for multiple visible barcodes that could compete with the intended scan.
- Ensure the barcode is scannable without opening/tearing the sellable unit (especially polybags).
- Require photo proof from factory/prep: labeled unit + close-up barcode + packed carton.
- Separate batches physically during labeling (avoid “variant drift” on the same table/line).
- Log exceptions (wrong label, bad print, placement issue) and rework them before cartons are sealed.
Minimum handoff packet: what your factory, prep partner, and forwarder all need
A standardized handoff packet prevents “we used the old labels” surprises:
- SKU list + variant identifiers + product photos.
- Barcode path per SKU (FNSKU vs manufacturer barcode).
- Label PDFs (if using FNSKU) + mapping file.
- Label placement rules + “cover competing barcodes” rule of thumb.
- Carton plan (what SKUs go in which cartons) and who approves changes.
- Proof requirements (photos + scan test confirmation).
If you’re consolidating from multiple factories or switching workflows ahead of March 31, 2026, it often helps to outsource the China-side “label QA + consolidation” step so errors are caught before export. FBABEE can coordinate supplier pickup, consolidation, prep/labeling, and a photo/scan-check handoff package—so you’re not debugging barcodes after the shipment arrives.
FAQ
Q: When should I use an Amazon FNSKU label vs a manufacturer barcode (UPC/EAN/GTIN) for FBA?
A: Use the barcode path your listing is set to use—but decide early, before packaging is printed. If you need tighter attribution control, have many suppliers/SKUs, or you’re not eligible to use manufacturer barcodes stickerless, standardizing on FNSKU is often the safer operational choice.
Q: Is FNSKU required for every FBA product, and what determines that?
A: Not always—it depends on your barcode setting and eligibility at the SKU level. The safest approach is to verify in Seller Central before you print labels or packaging, because eligibility and requirements can change.
Q: What changed on March 31, 2026 for barcode requirements and commingling?
A: Amazon has announced commingling practices will end and barcode eligibility will be updated effective March 31, 2026. If you currently rely on stickerless manufacturer barcode workflows, treat this date as a trigger to verify eligibility and prepare an FNSKU labeling fallback.
Q: After March 31, 2026, who can still use manufacturer barcodes (and what should I verify)?
A: Amazon’s help pages indicate brand owners can continue to use manufacturer barcodes without stickers, but you should still verify eligibility and settings in your account. If you’re unsure or you source from multiple suppliers, prepare an FNSKU workflow so you can switch quickly without reprinting packaging.
Q: Where should I place the FNSKU label so it scans reliably?
A: Put it on a flat, visible surface of the sellable unit’s outermost layer—after any polybagging or overwrap. Avoid corners, seams, and curved surfaces, and scan-test a few units after final packaging.
Q: Do I need to cover the UPC if I’m using an FNSKU label?
A: If multiple barcodes are visible, mis-scans become more likely—so sellers commonly cover or obscure competing product barcodes when using FNSKU. The practical goal is one clear scannable barcode on the final packaged unit.
Q: Factory vs prep center vs Amazon label service—how should I decide who labels my units?
A: Choose the option that gives you mapping control and a verification gate before export. For US shipments, also verify whether Amazon’s prep/label services are available in your account for 2026, and keep a backup plan (self-labeling or a prep partner).
Summary: your barcode decision checklist before the next FBA shipment
If you want the short version, do these four things:
- Verify first: confirm barcode eligibility and your current barcode setting before you print packaging or labels.
- Choose a path you can execute: manufacturer barcode only works when packaging stays clean and eligible; FNSKU is more work but easier to standardize across suppliers.
- Label for scanning, not aesthetics: outermost layer, flat surface, no competing barcodes.
- Add a China-side QC gate: SKU→label mapping + photo proof + scan test before cartons leave China.
If your shipment involves multiple suppliers, lots of variants, or a 2026 workflow switch, consider outsourcing China-side consolidation and label QA so you catch problems before export—not after FBA receiving.


