Welcome to our comprehensive guide on Amazon FBA box labels! If you’re an FBA seller looking to streamline your shipping process and ensure compliance with Amazon’s labeling requirements, you’ve come to the right place. In this blog, we’ll dive deep into Amazon FBA’s specifications and requirements for various box labels.
But first, let’s quickly break down what you’ll learn from this article:
- An overview of all FBA box labels, helping you gain a clear understanding of the labeling landscape.
- Explore in-depth research on Amazon FBA’s two most important labels: the Amazon FBA shipment ID label and the Amazon FBA carrier label, so you can nail their specifications and requirements.
- Practical tips to help you navigate the labeling process with ease and efficiency.
With our guidance, you’ll get to know Amazon’s label specifications and requirements inside and out, empowering you to streamline your process.
Let’s jump right in.
Understanding Amazon FBA Box Labels
Check out the table of contents for key information:
| Shipping Process | Label Types | ||
| Consigner | Consignee | Shipment Label | Carrier Label |
| Supplier factory | Gathering warehouse | / | 1️⃣ |
| Gathering warehouse (China) | Sorting warehouse (USA) | / | 2️⃣ |
| Sorting warehouse | The 3rd-party warehouse | 3️⃣ | 4️⃣ |
| The 3rd-party warehouse | FBA fulfillment center | 5️⃣ | 6️⃣ |
| Note: The 3rd party warehouse is an optional loading place | |||
Let’s look at the six different types of labels used in the Amazon FBA process:
- 1️⃣: Carrier label from your supplier’s factory to your freight forwarder’s gathering warehouse
- 2️⃣: Carrier label from your freight forwarder’s gathering warehouse to their sorting warehouse in your country
- 3️⃣: Box ID label for 3rd-party warehouses (if applicable)
- 4️⃣: Carrier label from your freight forwarder’s sorting warehouse to a 3rd-party warehouse (if applicable)
- 5️⃣: FBA shipment/ID label for entry into Amazon FBA fulfillment centers
- 6️⃣: Carrier label from the previous warehouse to the FBA warehouse
These labels play an important role in ensuring that your products make their way through the supply chain without any hiccups. All these labels are important, however, as a seller, your main focus should be on these:
- 5️⃣: FBA shipment labels
- 6️⃣: Carrier labels to the FBA warehouse
For all other labels, make sure your suppliers and freight forwarding company conduct audits to ensure safe transportation.
Now, let’s take a closer look at these two types of labels, their specifications, and their requirements.
Amazon FBA Shipment Label- The Essential Label
FBA shipment labels are among the most important shipping box labels for Amazon sellers.
On one hand, accurate Amazon FBA shipment labels ensure proper product identification and tracking throughout the fulfillment process, avoiding misplacement or delivery errors.
On the other hand, failing to attach shipment labels correctly can result in delays, misrouting, product loss, or worse, penalties and account suspensions.
That’s why it’s so important that you get your shipment label right.
Specifications of FBA Shipment Labels and 3 Details to Check During Creation
To minimize the risk of product rejection by Amazon, you must familiarize yourself with the detailed information included on Amazon shipment labels. This will help you avoid errors in barcode information.
Amazon Shipment Label Example: Familiarize Yourself with Its Contents
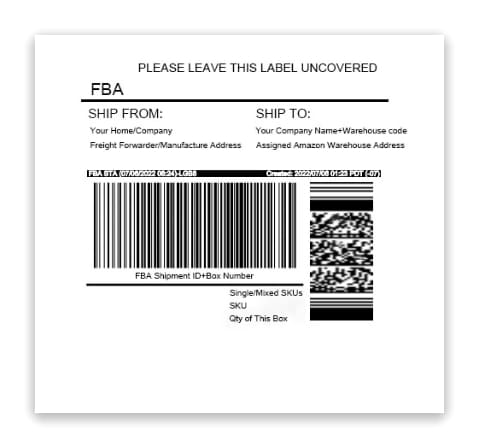
- Box Number
Usually, the box number is displayed on the top, like ‘Box 1 of 2.’ Alongside it, you’ll find the weight of the box. And on the very left, you’ll see ‘FBA’ or ‘Amazon.’
- Ship From
Right under the box number is where you’ll list the seller’s name and the address of your supplier’s warehouse.
- Ship To
This is where you should list the Amazon warehouse address, generated by Amazon in the shipping plan. Place it to the right of the ‘ship from.’
- Amazon Shipping Barcode
Amazon fulfillment centers use this unique shipping barcode to scan your boxes. There is also a corresponding serial number, with the date of the shipment ID created listed right above it.
- Quick Response Code
On the right side of the Amazon shipping barcode, there’s a QR code that contains the same shipping information as the barcode.
- Quantity of Products
This lets people know how many units of product are in each box.
- Single/Mixed SKUs
This mark indicates whether your box contains one or multiple SKUs.
- Prep Required
If you choose to use Amazon’s prep packaging services, the label will be marked: ‘FC Prep Required – LABELING.’
- Handling Information
On either the top or bottom of the FBA shipment label, there will be a note that reads, ‘Please leave this label uncovered.’
Remember to Check These Three Details During the Create Shipping Plan
There are three areas that require self-verification during the label creation process to ensure accurate labeling during packaging:
- Product’s name and data
- Seller’s name and address
- Amazon shipment barcode
Once you have made sure these are correct, you can proceed with printing the labels and affixing them to the boxes.
FBA Shipment Label Requirements
The second step in making sure that labels are correct is to verify printing and application requirements for Amazon labels.
Printing Labels for FBA Boxes: Every Requirement You Need to Know
- Amazon FBA Label Printer
Try to use a thermal or laser printer to print labels rather than an inkjet printer which may cause the labels to be too blurry to read or scan.
- Paper
The paper should be white and not able to reflect. Thermal labels are the popular choice, but transfer paper is the better option if your products are going to be transported long distances.
- Adhesive
Use removable adhesives, so that Amazon can easily rip labels off without leaving residue after delivery.
- Resolution
To ensure readability, set the resolution over 300 DPI and the scaling to 100%.
- Duration
The quality should be good enough to be scannable for up to two years.
- Size
Original Amazon shipping label sizes are 3 1/3×4 inches (8.4 x 10.2 cm) or 4 x 6 inches (10.2 x 15.2 cm), while the largest one is A4. Choose size based on box size.
- Color
Only print labels in black and on a white background. Colored inks do not hold up well under certain climate and transit conditions.
- Font
Amazon recommends normal font weight and that you use an 8-point font size. Do not bold font. Using the default option is best
Amazon Labeling Placement Requirements
There are two placement requirements for labels:
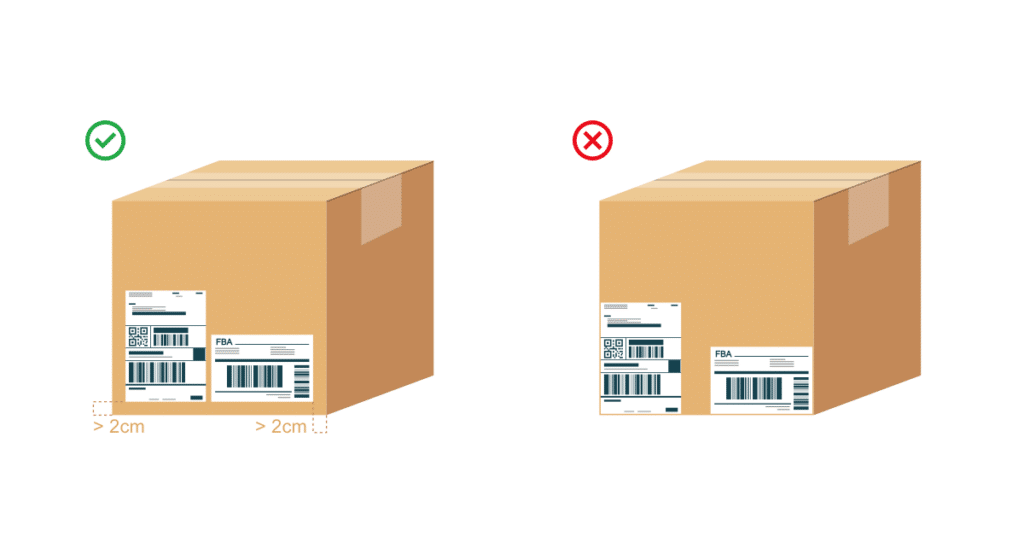
- Labels on new boxes
Always place labels on a flat side, keeping them at least 0.3 inches away from the box seams, and uncovered for easier scanning. You can place labels on the top of the box or on either side.
- Labels on used boxes
If you are using a used box to ship to Amazon, make sure the old label is completely covered by the new label. This will help Amazon avoid confusion.
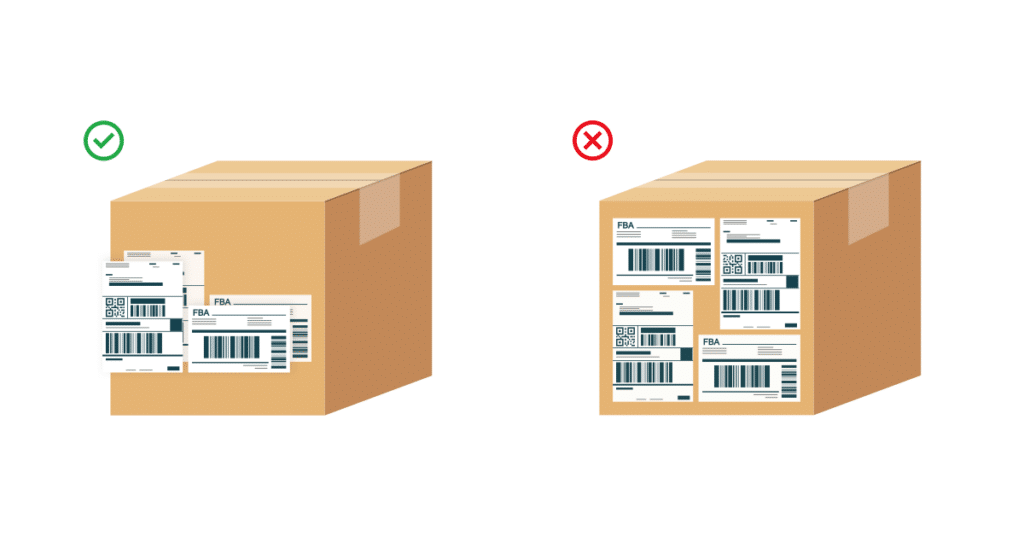
Labeling FBA items is just one aspect of Amazon labeling. Next, you will learn about Amazon FBA carrier labels, so that you can complete the entire labeling process.
Amazon FBA Carrier Label – The Vital Label
Sellers have to upload carrier labels back to Amazon after a shipping plan is created for tracking and update purposes.
The carrier label offers vital product information for carriers, such as the product’s value, HS code, and quantity for customs clearance. If you use these incorrectly, it’s likely products won’t make it to Amazon warehouses. The carrier label plays an important role in the FBA process.
Ok, let’s learn some more about this below.
Specifications of FBA Carrier Labels and 2 Checking-points
Most carrier labels look similar and don’t require a fixed template, unlike shipment labels. Let’s look at UPS to help highlight this point.
FBA Carrier Label Example: Probe Into What Is On The Label
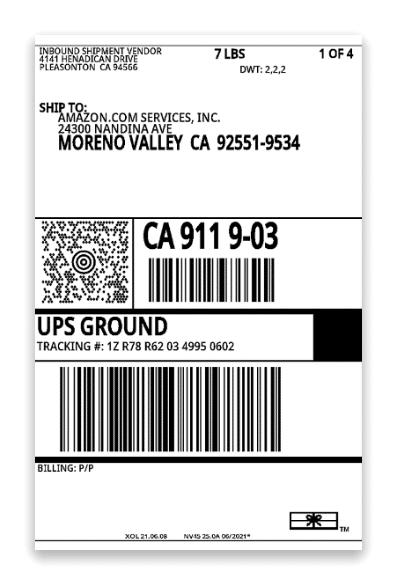
- The shipper’s name and address
You’ll need to put the shipper’s name and address on the top of the carrier label so that it stands out.
- The recipient’s name and address
Provide your freight forwarder with the address in this section. And don’t forget to fill in the information yourself if you’re shipping express.
- Box weight and number
Usually, the gross weight of the box appears as ‘LBS’ or ‘KG,’ as well as the box number, which is displayed as ‘X of XX.’
- Destination code
You can find the destination code in the middle of the label You’ll also see a barcode for custom clearance. The QR code near it is also there to help carriers sort packages.
- Urgency
Carriers offer several options for service classes, ranging from urgent to normal delivery. Make sure you include this on labels so that couriers know if an order is urgent.
- Barcode for tracking
Every carrier label has a tracking barcode and serial number. After carriers scan this barcode and update the logistics online, you can track your orders and upload updates on Amazon.
FBA Carrier Label Checkpoints
Sellers must verify the following items when creating Amazon Logistics carrier labels:
- The shipper’s name and address
- Receiver’s name and address
Always make sure everything is correct to ensure successful delivery.
Amazon FBA Carrier Label Requirements
In this section, we will explore carrier label requirements.
Printing Requirements for Amazon FBA Shipping Labels: UPS Example
- Printers
It’s always best to use a thermal printer, but other printers can be used too.
- Sizes
Usually, the larger the label, the higher the cost. However, you also need to consider your box size and printer capacity. Common carrier label sizes include:
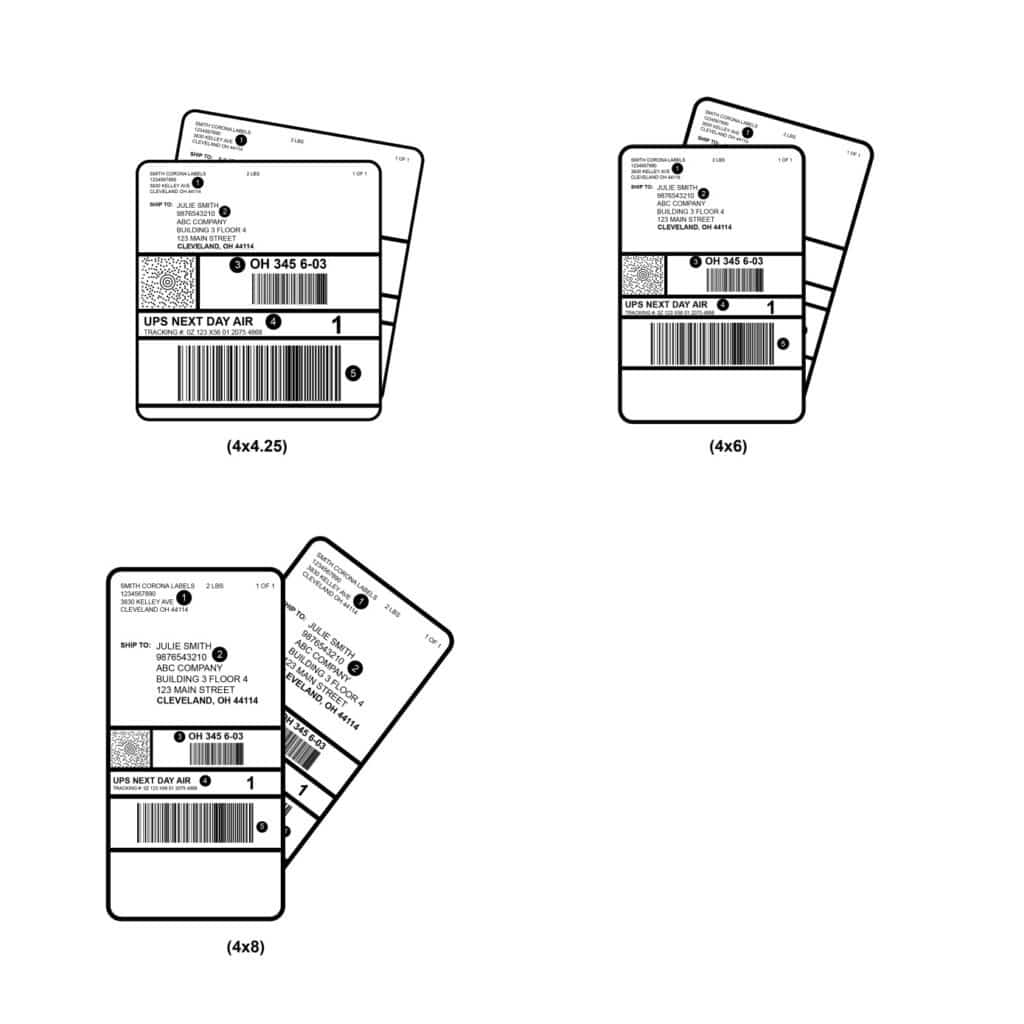
1) Compact Parcel Labels – 4×4.25 inches
These labels are very small and are only suitable for small product boxes.
2) Most popular size: Standard 4×6 inches
This size is so common that carriers in the US, Asia, and most of the EU use it the most. With these labels, you can print carrier-required text, barcodes, serial numbers, and similar information.
3) Slightly bigger: 4×8 inches
Because this size is slightly bigger than the standard size, you can fit more information and things like logos or images.
- Color
Print the label in black font and on a white background, without colorful lettering, just like you do with box labels.
- Paper Type
Common thermal or laser paper fits well on corrugated boxes. But pay attention to the adhesive because it needs to be durable.
Where to Put the Carrier Label On the FBA Box: One Simple Rule
It’s always better to attach carrier labels alongside FBA shipment labels for quicker check-in and scanning. Just make sure that the carrier label is not in the middle of the slip.
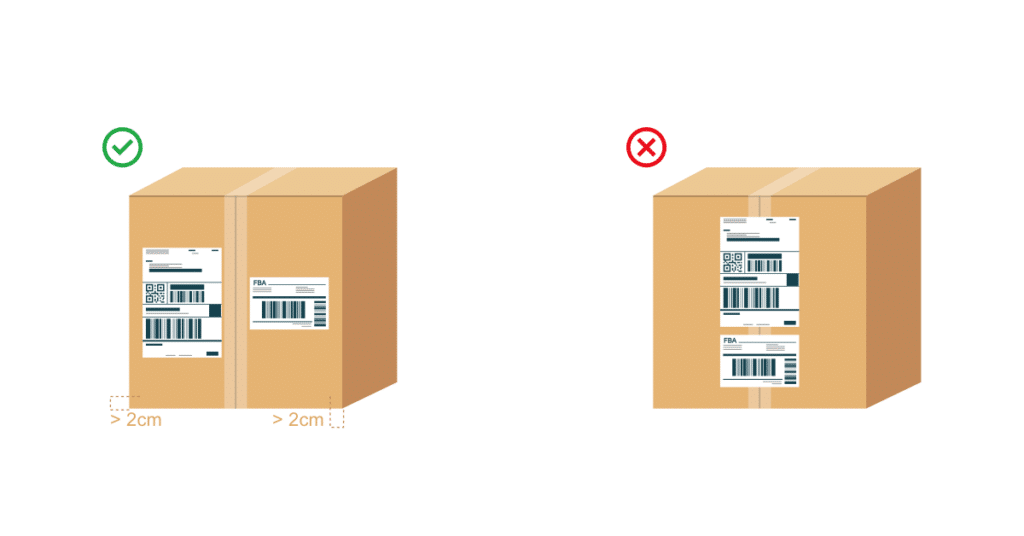
Now that we’ve covered the two most important FBA labels, you might be wondering how to label them. In the next section, you’ll find out.
How to Label Your Amazon FBA Boxes: 3 Different Methods and Pros & Cons
There are 3 ways to label boxes:
- Work with Your Freight Forwarder
The first way to label your Amazon FBA shipping box is to work with a freight forwarder.
Pros: They are pros in the FBA process, so they can make sure that each order is issue-free.
Cons: There are lots of freight forwarders, but not all of them are created equal. So it might take some time to find the right one. - Resort to Your Product Supplier
Many Amazon sellers have their suppliers label boxes.
Pros: If you are a relatively new seller whose inventory is small, using your supplier can be cost-effective.
Cons: Few suppliers are pros when it comes to logistic requirements. So there’s a greater possibility for label errors to occur. - Do It Yourself: Labeling In the Warehouse
This option works great for Amazon sellers who own a warehouse where they can handle the labeling themselves.
Pros: If your products need custom labeling services, you can take care of them in-house after products are sent in.
Cons: You might not be familiar with all of Amazon’s shipment labeling rules. So, you’ll have to put in some work to check your labels. Also, you might need to get a qualified printer.
A summary:
| Ways | Advantages | Disadvantages | ||
| Use Freight Forwarder | Smooth FBA process | Risk of poor service | ||
| Use Product Supplier | Cost-effective and simple | Risk of labeling mistakes | ||
| Do it by yourself | Flexible inventory management | Extra fee for labeling | ||
3 Beginner Tips about Amazon FBA Box Labels That You Need to Know
In this section, we’ll give you 3 practical tips to help you understand more about how to label Amazon boxes.
Tip 1: How to Print Your Amazon FBA Shipping Labels
There are 5 basic steps:
- Log in to your Amazon Seller Central account and click the Inventory option.
- Check the shipment details or click the Edit option.
- Choose the shipping method.
- Set up the box specifications.
- Download the label file and print the labels.
Tip 2: How to Choose the Right Printer for FBA Shipping Labels
While Amazon itself doesn’t have specific printer requirements, printers like Zebra are popular among Amazon sellers. Choose a printer based on your budget and printing requirement capacity:
- It supports printing 4×6 inches labels;
- It supports connecting with your computer or can directly download from Amazon;
- It supports running at high speed.
Tip 3: How to Label Multiple Boxes With Mixed SKUs Correctly
There are 2 ways you can label multiple packs with different SKUs.
The first way:
- Step 1: Begin by numbering each of your boxes. Make sure all SKUs in the boxes are listed correctly.
- Step 2: Create a shipping plan and print the shipping labels.
- Step 3: Label the boxes according to the packing list.
The second way:
- Step 1: Create a shipping plan ensuring the total quantity of products is clear.
- Step 2: After the shipping plan is created, download the packing list and pass it to your supplier.
- Step 3: Your supplier packs the products and labels them based on your list.
Conclusion
Hopefully, you’ve figured out everything you need to know about Amazon FBA Box Labels and requirements.
But, let’s make sure:
- You understand what box labels are and how they work from an international transport perspective.
- You understand what FBA shipment labels and carrier labels are and how to comply with requirements.
- You understand how to label your boxes more efficiently.
For more helpful information, please visit our other blogs published in The Amazon Packaging Requirements Content Hub.
